Contents
How to Make a Simple Fabric Headboard
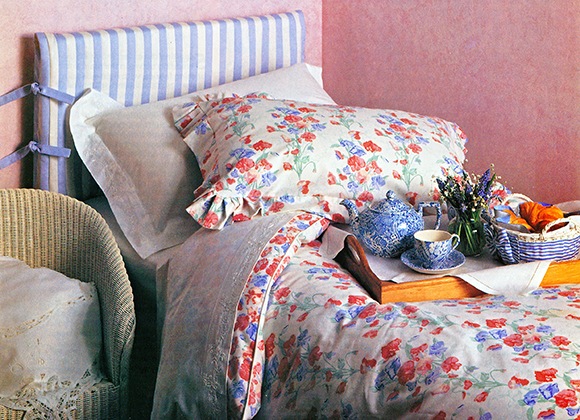
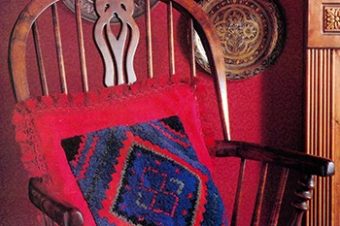
Here, smart blue and white stripes, quilted along their length, make a simple fabric headboard and bring a fresh new look and added comfort to a plain headboard.
If your headboard is a little old and worn, or clashes with a fresh color scheme, you can quickly give it a new look with a tie-on or slip-on fabric cover. Simple fabric headboard covers can be made in half the time needed to re-upholster a padded headboard, and for a fraction of the cost of a new one.
If the headboard is hard, be sure to quilt the cover for comfort and a softer look. Tie-on covers are best reserved for rectangular headboards, but slip-on covers can be made to accommodate the most unusual shapes and styles.
Washable furnishing fabrics are best for creating a hard wearing cover that is easy to clean on a simple fabric headboard. Choose a fabric which not only matches your bed linen, but also blends well with the wallpaper and other bedroom furnishings – your simple fabric headboard should provide a decorative link between the bed and the rest of the room.
Make the Tie-on-Cover
Materials
Rectangular headboard You can use either a padded or a hard headboard, as the cover is quilted
Furnishing fabric to cover the head-board (see steps 1 and 2 for quantities)
Medium weight wadding and backing fabric for quilting the cover (see steps 1 and 2 for quantities)
Lining fabric the size of the finished cover, plus seam allowances
Matching sewing threads
Tape measure
1. Measuring up for a simple fabric headboard
Measure from the bottom edge on the front of the headboard, where it meets the mattress, over the top and down to the same point on the back. Then measure the width across the front of the headboard. Add 13cm(5in) to measurements for seams and ‘shrinkage’ during quilting.
2. Cutting out
Cut out one rectangle of your main fabric, together with one of backing fabric and one of wadding, to the required size. From your main fabric, cut another two pieces the full height of the headboard plus 4cm (1 1/2 in), by 18cm (7 in) in width – these panels will cover the side edges of the headboard. Also cut 12 strips 23 x 7cm (9 x 2 3/4 in) for the fabric ties. Cut out along the straight grain, and position the pattern on your main fabric so that it will lie attractively on the finished cover.
3. Hemming the side panels
Take the two pieces of fabric for the sides of the headboard. Turn under and stitch a double 1cm (3/8 in) hem, down one long edge and across both short edges of these panels, mitring (cut at 45º angle) the corners for a neat finish.
4. Stitching the fabric ties
Take the fabric strips for the ties and fold each one in half lengthways, with right sides facing. On each tie, stitch along the long raw edge and across one short edge, taking a 1cm (3/8 in)seam allowance. Turn through to right side and press flat.
5. Quilting the cover
Sandwich the wadding between the main and backing fabrics, with right sides out. Pin and tack the layers together at regular intervals. Machine quilt the cover in your chosen design: either take the fabric pattern as your quilting guide, as on the striped cover featured here, or simply use a basic quilting design, such as a trellis pattern. Remove the tacking stitches and trim the cover to match headboard measurements, adding 1.5cm (5/8 in) all round.
6. Positioning the ties
Lay out the quilted cover, with right side up. Position the fabric ties down both long edges of the cover, so they lie over the cover, with raw edges matching; pin one tie 3cm (1 1/4 in) in from each corner, one just under a quarter of the way in from each corner, and the remaining four nearly halfway along each long edge. Fold the cover in half width ways to check that each tie on the cover’s front lies directly over its counterpart on the back. Tack in place.
7. Attaching the side panels
Lay out the quilted cover, with right side up. With right sides facing, place the two hemmed side panels over the lower front corners of the cover; line up the raw side edge of each panel with the side edges of the cover, and place the hemmed bottom edge of the panel 1.5cm (5/8 in) in from the cover’s lower edge. Pin and tack in place, over the fabric ties.

Any small child would love to have a bed like this. The large car motif matches the duvet fabric perfectly, while a smaller one has been used to trim the pillowcase.
Slip-on covers
If your slip-on cover rides up the bed head, you can hold it firmly in place with fabric ties. Simply sew pairs of ties to the bottom hem of the front and back panel, and tie them together under the headboard.
Reference: The Country Look—Decor & Crafts
![]()


7 Responses
Appliqué Towels in 5 Easy Steps - Crafting DIY
[…] is the simple technique of cutting a motif from a ready-printed fabric and applying it to a background. It is the quickest and easiest way to achieve an appliqué […]
5 Easy Headboard Ideas DIY - Crafting DIY
[…] a simple wooden headboard can be painted in one solid color, bold stripes or vibrant checks, to match your decor. Try […]
Le Pwner
It already has a decorative metal headboard and footboard (headboard cannot be removed, it is part of the frame), but I was wondering if I could get some sort of cushioned headboard or some other sort of cushion which I could attach to the metal headboard to make it comfy for sitting up against?
If so, any idea where I can get something like this?
Katie
Yes you could do it with panels and sheeting but it might be better to use wallpaper and remove this before you move. Fabric pinned to the walls in the colors you want is also an option but can be more expensive.
Katie
You will have to fold it and hem it so that all the fabric is tucked away and used, but you might still have a problem later on when you unpick the stitches that the needle marks might remain and not look so good.
stealspartansbcglobalnet
I have a piece of cloth which I’d like to use on a headboard, however, I don’t wish To cut or staple it. I’d like it to be completely undamaged, and be able to utilize it again someday for something else. How may I do this?
Jack Bauer
I wish To change my baby blue bedroom to black plus orange however, I’m 20 plus must move out inside a couple years plus my parents don’t desire either color found on the walls considering they are difficult to paint over. I was thinking when there was an effortless method to change the color without doing anything to the drywall? Are there inexpensive temporary wall panels I could place up plus paint?