Contents
Make Mortise and Tenon Joints
Story & Pictures by Janek Szymanowski ©

While there are many items that you can use to fasten pieces of wood together, it is essential to choose the right joint for the job at hand.
Traditional craftsmen use many different joints, some of which are quite complicated to cut. This is partly because when the joints were originally devised they didn’t have the good quality wood glues we have at our disposal today. Nevertheless, many traditional joints were made so that they looked attractive and would not pull apart.
The mortise and tenon joint is regarded as the building bloc of all solid wood joinery.
Different Types of Mortise and Tenon Joints
Mortise and tenon joints are among the most complicated joints you will find, but they are also extremely strong, and are therefore used for structural items like door and window frames, as well as for furniture.
Having said that these joints are complicated, they are in fact straightforward to make, provided you follow the given steps precisely. Accuracy, though, is essential. This is one type of joint you definitely can’t simply bang together.
Traditionally mortise and tenon joints were cut by hand. Our instructions show how to cut these joints using hand tools as well as a circular bench saw. If you have bench or power tools, you can use these for many of the steps, specifically those that entail sawing and planing. Or you can stick to less expensive hand tools.
There are several different types of mortise joints:
- common or stopped,
- fox-wedged, and
- barefaced.
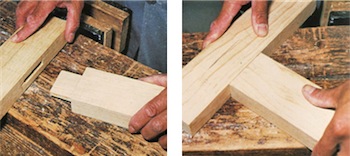
A feature of the common or stopped mortise and tenon joint is that the tenon is exactly a third of the thickness of the piece of wood into which it slots. The depth of the mortise should be half to three quarters the width of the wood that is used for the frame you are making, so that it doesn’t show on the other side. As you can see from the two pictures (left), when the tenon is pushed into the mortise, the two pieces of wood join snugly together.
On some occasions the tenon does protrude through the frame (see Step 16 below), and it will then need to be wedged into placed (see Step 17). This is called a fox-wedged mortise and tenon joint and it is often used when making chair frames. In the event of a fox-wedged through-joint coming loose, you can repair it by carefully cutting down the mortise with a tenon saw to open the joint. Then push the wedge to the bottom of the tenon. This forms what restorers call “a secret-wedged tenon”.
A barefaced mortice and tenon joint is offset to one side so that the front face lies flush with the front face of the wooden frame into which the mortise has been cut. The tenon is cut in the same way as a half lap joint [link to Common Joints], to form an L-shape. The motivation for this is that it produces a particularly strong join where different sized pieces of wood are connected together, for instance where narrow rails are joined to a thicker frame.
To completely cover the mortise hole and hide the tenon, the tenon is reduced in width or “shouldered” by cutting both sides to form an upside-down T shape. This produces a particularly nice, snug fit. Another option is to haunch the tenon (see Step 12) by cutting one side only to form a rather squat looking L shape. This option has the advantage of increasing the width of the joint and strengthening it at the same time.
Step-by-step Guide to Crafting a Common Mortise and Tenon Joint
The illustrated steps that follow show how to cut and assemble a haunched mortise and tenon joint which is also wedged. The same techniques are used for all variations of mortise and tenon joints, even if you don’t choose to haunch or wedge the joint. Furthermore, several of the basic marking and cutting techniques shown may be used to make other joints, including both housing (see Step 10 below) and half lap joints. [link to Common Joints] You can also cut halving joints as shown in Step 8 below.
The tools which you will need to make a common mortise and tenon joint include:
- wooden work bench
- carpenter’s square
- steel ruler
- measuring gauge
- carpenter’s pencil
- circular saw
- clamps
- chisel with a 10 mm blade
- tenon saw
- planers (including a rebate planer)
- wooden mallet
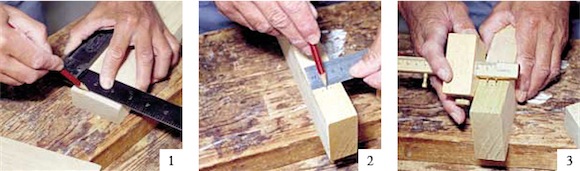
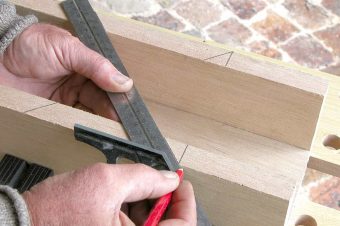
1 – Carpenters Square
Use a carpenter’s square to mark where the frame will end. Do not trim the wood yet; this is one of the last things you will do.
2 – Measure & Mark
With a steel ruler or the square, measure and mark a central point as well as 5 mm (about a quarter of an inch) on either side of it. The wood used here is 72 mm x 32 mm (about 3″ x 1½”) so the tenon should be about 10 mm (or no more than half an inch) thick.
3 – Mark The Tenon
Position your measuring gauge on the two points you made on either side of the central point, and drag it firmly against the wood towards you, to mark the position of the tenon.
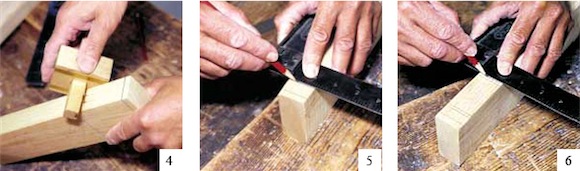
4 – Mark Opposite Side
Use the gauge to mark the position of the tenon on the opposite side of the wood. Note that you can see the mark where the frame will eventually need to be trimmed.
5 – Mark Mortise & Groove
Measure and mark the position of the mortise, as well as the position of the shallow groove that must be cut for the L-shaped tongue. Be careful to ensure that the mortise lines up exactly with the tenon.
6 – Allow 5mm For Wedges
Remember that this example has the tenon extending through the frame, and so it needs to be wedged to keep it in place. Use your carpenter’s square to mark 5 mm on either side of the lines you have drawn to mark the position of the mortise. This will allow for the wedges.
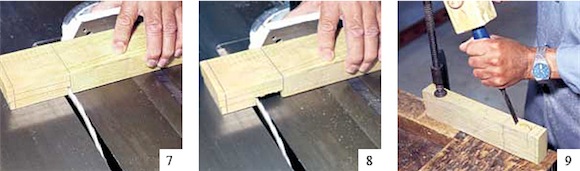
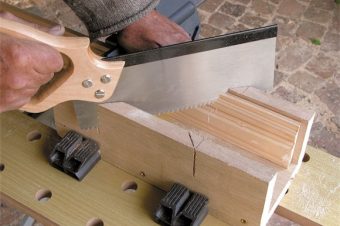
7 – Cut The Tenon
Now cut the tenon. If you are using a bench saw, set the depth accurately so that the top of the blade lines up with the marked position of the tenon.
8 – Cut From Center
Cut from the center working towards the outside edge of wood, gently pulling the wood backwards and forwards. Turn the wood over, and repeat on the other side. Use vertical cuts to finish it off.
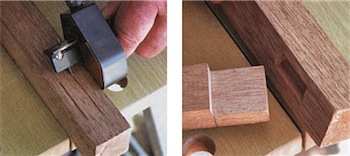
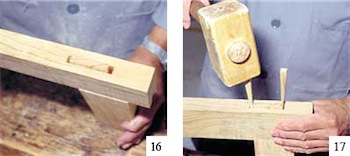
9 – Chisel Out Slot
Clamp another piece of wood to your workbench and chisel out the mortise slot. Remove the wood from the mortise in small wedges using a chisel with a 10 mm blade.

10 – Chisel Out Haunch
Then chisel out the shallow groove for the haunch on one side, working to a depth of about 10 mm.
11 – Mark Position Of Haunch
Place the tenon against the mortise and mark the position of the haunch on the tenon. Once you have cut one side away, the tenon will look like a chunky L.
12 – Saw Wood
Use a tenon saw to cut the wood, carefully cutting the side of the tenon to form the haunch.
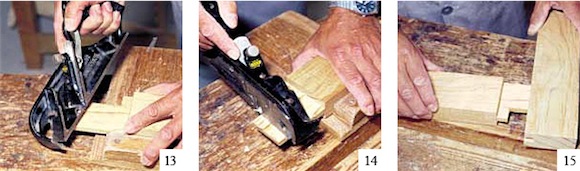
13 – Sand Edges
Plane or sand all the sharp edges.
14 – Smoothe The Surface
Use a rebate planer to smooth the surface of the tenon.
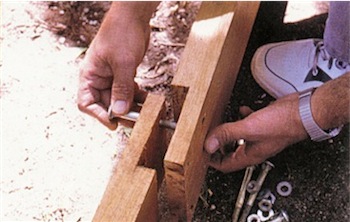
15 – Tenon Into Slot
Now slide the tenon into the mortise slot.
>
16 – Gaps
Once the tenon is in place, there will be obvious gaps on either side of it.
17 – Wedges Into Gaps
Cut two wedges (longer than the depth of the wood) and hammer them firmly into the gaps using a wooden mallet.
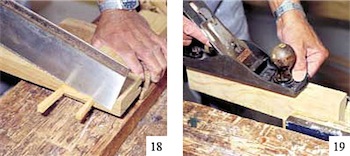
18 – Trim Wedges
Once you have knocked the wedges in firmly, use the tenon saw to trim the ends.
19 – Plane surface
Plane the surface of the frame so that the end of the tenon and previously visible ends of the wedges are smooth and even.
![]()


4 Responses
5 Common Woodworking Joints - Crafting DIY
[…] made so that the two pieces of timber interlock in a similar way to the more complicate mortise and tenon joint, but with a tongue that fits into a centered slot in the other piece of […]
Janek
Hi, Wiki is a good place to start here is the link: wikipedia.org/wiki/Tenon_saw
zaclo
please help with my homework due tomorrow D:
cant find ANYWHERE
who, where and when was the tenon saw (backsaw) invented.
first right answer gets 10 points c:
Jenna
I’m doing a school project and need to know what sort of things you can make with a tenon saw e.g a shelf or something