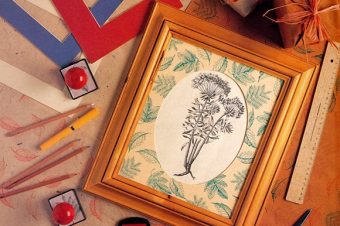
How to Make Padded Picture Frames
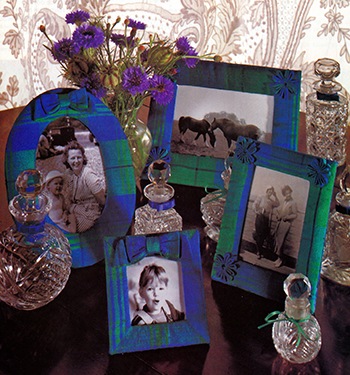
Photos are one of the best ways of capturing magic moments and favorite friends. Here, each photo has been suitably framed in stylish blue silk tartan and trimmed with rosettes or bows.
Simple padded picture frames are one of the easiest home accessories to make. With a small amount of fabric and scraps of card, you can make up a set in no time at all. They look best made in several sizes, and grouped together in a display on an occasional table or mantelpiece. The finished frames can be left plain or decorated with bows or neat rouleau rosettes like the ones shown here.
Choose a fabric to co-ordinate with the rest of your furnishings or pick one that sharply contrasts to jazz-up plain surroundings. Small designs, checks or stripes always work well, but you must choose a fabric with a firm weave and sufficient density to cover the card which forms the structure of each frame. Picture frames can be made in various shapes as well as sizes, so choose your favorite photos or pictures and then make frames to suit them.
Making the Frames
It’s easy to make padded picture frames especially if you use ready-cut picture frame mattes.
Materials
Silk tartan fabric 1m (1yd) of 114cm(45in) wide
White card 85 x 30cm (33 1/2 x 12in)
Picture frame mattes various sizes
Sharp craft knife
Ruler
Medium weight wadding 50cm (5/8 yd) of 90cm (36in) wide
Clear fabric adhesive
Sewing thread
Needle
Clear acrylic sheet for the frame window
Here are 8 step by steps for making padded picture frames
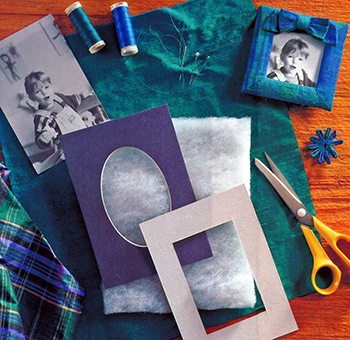
1. Cutting out card frame
For the large frame front cut a piece of card 21 x 16cm (8 ¼ x 6 ¼ in). Then using the craft knife and ruler, carefully cut out the central aperture to measure 14 x 9cm (5 ½ x 3 ½ in), leaving a 3.5cm (1 3/8 in) frame all round. Cut another piece of card for the frame back, deducting 5mm(1/4 in) from front measurement. This you will not do if you buy ready made picture frame mattes.
2. Preparing the fabric
Measure the top edge of the frame and its width. Cut two strips of fabric to these measurements adding 4cm (1 1/2 in) to both for seam allowance. Lay fabric strips flat. Fold up each end diagonally. Cut diagonally allowing 1cm (3/8 in) seam allowance.
3. Miter the corners
Measure the length and width of the frame side and cut two strips of fabric to these measurements adding 4cm (1 1/2 in) to both for seam allowance. Cut the ends diagonally as before so they will match with the top and base strips to form a mitre at each corner.
4. Stitching the frame front
Pin and stitch the fabric strips together to make up a frame, taking a 1cm (3/8 in) seam allowance and stitching to within 2cm (3/4 in) of the inner edges. Trim and press seams open.
5. Padding the frame
Stick card frame front, face down on wadding. Cut round the outer edge of the card frame and then around the center . The easiest way to remove the wadding from the middle of the frame, is to cut the wadding from the center .
6. Covering frame front
Lay fabric frame centrally over wadded side of frame front; pin to hold. Turn inner edges through aperture and stick 2cm (3/4 in) seam allowance to wrong side. Take outer edges over frame edges and stick in place on wrong side.
7. Preparing the back
Cut two pieces of fabric for frame back; one the same size as card plus 2cm (3/4 in) all round, the other 1cm (3/8 in) smaller all round. Place card centrally to wrong side of larger piece. Fold over corners, and trim before sticking fabric over card edges. Center and stick smaller piece on to card front.
8. Assemble the frame
Place the frame front wrong side up; thinly spread adhesive close to the edge of sides and base. Matching up edges, stick frame back on top with neatest side up. When dry cut acrylic sheet to same size as the picture and slide into the frame.
A few picture frame ideas here.
Reference: The Country Look—Decor & Crafts

18 Responses
Batik – How To Make One In 6 steps - Crafting DIY
[…] 8 Easy Steps For Perfect Padded Picture Frames […]
5 Common Woodworking Joints - Crafting DIY
[…] 8 Easy Steps For Perfect Padded Picture Frames […]
Crockery Mosaics 5 Hints - Crafting DIY
[…] can be used to decorate practically any surface from floors, walls and ceilings to table-tops, picture frames and pottery, both indoors and […]
Crockery Mosaics - Crafting DIY
[…] can be used to decorate practically any surface from floors, walls and ceilings to table-tops, picture frames and pottery, both indoors and […]
Treasure Trove Display Boxes - Crafting DIY
[…] thus ensuring that each piece stays in its compartment. These boxes will be a unique alternative to pictures or framed embroideries and provide a happy memory of holidays and special […]
Wire Keys Frame In 3 Easy Steps - Crafting DIY
[…] on a wire keys frame smart key holder. This one costs almost nothing to make if you have an old picture frame, a scrap of fabric and some bendable […]
Scott Bull
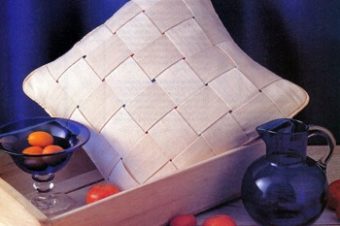
It looks like a big pic frame that’s been padded plus covered with fabric, then ribbons criss-cross over it. The ribbons hold the photograph collage inside area.
Janek
use a flat waterbased acrylic as a first coat, other paints will eat the styrofoam. there are stryofoam specific paints available ask your hardware store people.
Janek
Plastic bubble wrap will protect it or put it between two sheets of corrugated cardboard and mark the envelope FRAGILE!
ericmreitz
I wish To send a pic frame which is made from glass & I was thinking do I really have to place it into 1 of those padded manilla colored envelopes? Or do I should do anything additional to ensure it doesnt break? It will be shipped to a city 2 hours away from my house
alberto s
I am utilizing styrofoam to create several pic frames plus I would like to paint them to my color decor.
Janek
Wow! Sounds to me like you have more than enough already.
Janek
The zebra and black shelves on a light yellow background will be striking enough.
Jairo
Im decorating my space with Zebra Print plus Yellow because of it being a highlight color. Im getting a Zebra seat plus i have a bunch of black shelves plus pic frames, however, the suggestions stop there. any tips?
Myles
I want assistance!!!! I have NO CLUE wat to give my bf for the 1st year as well and its coming up shortly! my budget is beneath $250 so far i’ve gotten/made cookies, coupon book, pic card, Burberry cologne, Locoste shirt, custom hat w/ embroidery, keychain with my photo, reeses, film card, beat pad… plus im running out of choices! pleeeeaaaase help! thanks very much!
Anny
For my project I am considering having 3 pic frames. However every of the pic frames have a theme. I wasnt certain on what type of theme for every, maybe nature, animals plus individuals..
nevertheless I need it to be CREATIVE, fine art.. different plus stands out!!
Does anybody have any inspirations to what type of themed photography I can do?? thanks
Janek
Keep coming back to look as we are putting up crafty things every day.
Stevalicious
I like small crafty things or knick-knacks to sit about… What I’m talking about is: Maybe take an aged light bulb plus wrap it inside some 200 rubber bands, or have a small cool small anything to sit on my desk or perhaps a table. But it should be very easy, like it would need rubber bands, paper clips, or note pads, basically anything you will find about the home. Please help me out, my space looks thus dull!