Hand Painting Things
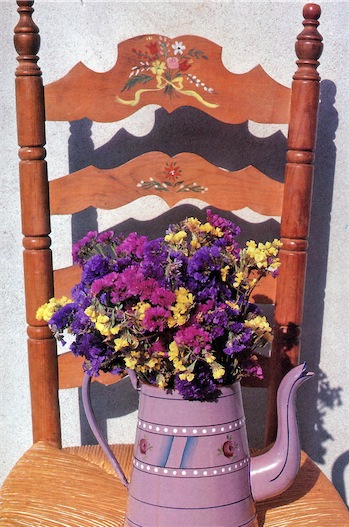
Hand-painting a cheerful posy on its top rail endows this plain chair with rural charm.
Hand painting things is a wonderful way of adding individual and coordinating touches to your home decorations without spending a great deal of time or money. You don’t have to be very artistic – a playful, naive image casually applied is frequently the most attractive and successful at creating a rustic appearance. When hand painting any minor imperfections such as smudges simply add to the charm of the decoration.
Hints for beginners
The best plan for a novice starting to do hand painting is to copy a striking, but simple motif from a picture or wallpaper. Traditional folk-art is an ideal starting point because the images are straightforward.
Whether you are copying designs or creating your own, always map them out on a piece of paper first. Use colored pencils or acrylic paints to arrive at a color scheme that will work with the room. Then use the sketch to assess where to position and paint the design on your piece of furniture.
Initially plan to paint small, clearly defined areas; a neat, compact ‘canvas’ like a cupboard door panel or even a chair rail is quite reassuring for the inexperienced artist. Fix your paper plan to the piece of furniture to see if the colors and scale work all right. If they do, lightly sketch the design in pencil onto the flat surface. Alternatively, you can transfer the pattern by slipping a piece of dressmaker’s carbon paper behind the plan and softly tracing around the outline with a blunt pencil.
How to paint flowers

This modest hand painting on a cupboard deserves to take pride of place in any setting, thanks to the sunny, floral folk-art design featured on the drawer and door panel. Note on the drawer front how an orange knob is cleverly substituted for the main flower pattern that appears on the door.
If in doubt about your technique and capabilities at first, stick to simple examples of folk-art designs, like barge painting. Here the motifs are built up with a basic petal-shaped stroke which is not difficult to master. In your mind’s eye, reduce the flower to its simplest outline.
For many, like daisies, buttercups, poppies and roses, this will be a circle, while a tear-drop forms a rose bud; for others, such as tulips and bluebells, it is a bell. Roughly sketch this basic shape on to a piece of paper in pencil. Then build up details in color within this boundary.
Practice hand painting on the paper first, using a good quality medium (size 4) brush and artists’ acrylic colors. Aim for smooth, fluent strokes, starting at the fat end and tapering to a point.
Next time you have an opportunity, look closely at a real flower you want to paint, or a picture of one. Note the position of the shadows and the high-lights; then with deep and paler paints you can pick out these shaded and lighter areas to give the bloom shape and form.
Stand back from your painting frequently to check the effect you are building up. Up close the results may seem very crude and un-flower-like; the long-distance impression is usually much more realistic.
Paint
Artist’s acrylic paints are ideal. If you want the design to have a slightly faded appearance, you can mix colors by blending artist’s acrylics with emulsion or artists’ oils with eggshell – white for pastels, or a paler tone of the desired shade for deep, rich colors.
Little pots of paint
Tiny tins of model painting enamel are an economical choice for small designs. They are available in a wide range of bright colors and dry to a hard-wearing finish.
Reference: The Country Look—Decor & Crafts




2 Responses
Watercolor Painting - Crafting DIY
[…] introduce a variety of brushstrokes, he used several types of brushes, including round red-sable brushes in three sizes-small (No. 3), […]
Gamer959
If i want to paint for my shirt and i want it to be permanent last for at least 2 to 3 years before it start fade away. Which paint should i choose? If possible please tell me the reasons. ThankYou