Paper Mache, the Supreme Paper Art
Basic techniques
Two basic methods are used in paper mache — one employing paper strips, the other, mash. In the first method paper is torn into strips and the strips are coated with paste before applying them to an armature.
The second method entails cooking shredded paper in a solution of water and glue to form a mash of a doughy consistency which can be applied to the armature and sculpted almost like clay.
The paper strip method produces surfaces and textures more suggestive of the natural qualities of paper, while mash surfaces, especially when sanded and painted, are more like wood, enameled metal, or glazed pottery.
The two methods can be combined.
First paper strips are used to build up the basic form on the armature, then mash is applied for a smooth finished surface.
Glues and gluing.
The two most commonly used adhesives are liquid white glue (PVA) and wallpaper paste. If you choose to work with white glue, thin it by mixing 1 part glue to 1 part water. Wallpaper paste, available at hardware stores, comes in powder form and is mixed with water. Slowly stir 1 part powder to 1O Parts water.
Do not cut strips with scissors. Tear them using a straightedge, or along the edge of a table. The rough edges of torn strips will mesh to make a smoother surface. The length and width of the strips you tear will depend on the size of the object you plan to make.
There are two ways to coat the strips with glue or paste: either put a handful of the strips into the water-thinned adhesive and let them soak for a few minutes before applying them to the armature, or soak a sponge in the adhesive solution and coat the strips with the sponge.
Be careful not to saturate the strips to the point where they begin to fall apart. As you apply the strips, use your hand or a sponge to wipe away excessive adhesive.
Both newspaper and paper toweling are good for building up the form on an armature before applying finer paper to the exterior. Tissue paper is difficult to work with because it may pull apart when the excess glue or paste is removed. Still, it is ideal for imparting a soft texture to an object.
Mash is easily made by following the steps illustrated below. Boiling the water hastens the breakdown of paper fiber and makes it easier to whisk. Craft shops carry commercial mash, a powder to which water is added.
Drying and finishing.
Most paper mache objects will dry overnight. Drying time can be hastened by using an oven preheated to a low or medium temperature. Dried objects can then be finished by sanding and painting their surfaces.
A mash surface is usually sanded smooth. Paper strip surfaces, on the other hand, are best left with the texture of the paper itself. Sanded or not, paper mache objects may be painted with any water-base paint.
Waterproofing and fireproofing.
To waterproof surfaces and make them more durable, spray the finished object with a clear vinyl sealer or give it at least three coats of lacquer. To fireproof an object, stir in 1 teaspoon of sodium phosphate (available at drugstores) to each cup of paste for strips or to each cup of water when making mash.
If you use mash instead of strips the surface can be sanded smooth, decorated with hand-painted designs, and finished with clear lacquer.
Making mash
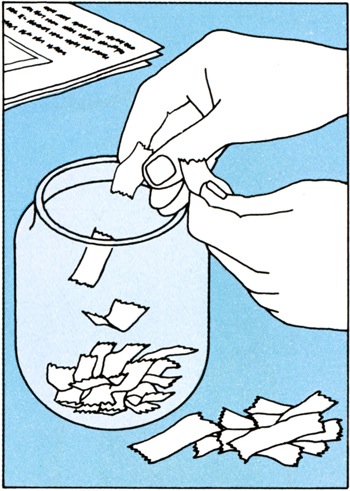
Step 1 – Newspaper Into Small Pieces
To make 1 quart of mash, tear four large newspaper sheets into small pieces. Place the pieces into a container with 2 quarts of water and let this soak overnight.
 Step 2 – Boil 20 minutes
Place the above mixture into a cooking vessel. Boil it for 20 minutes. Using a whisk, whip the paper until it is soft and puIpy.
Step 3 – Strain Pulp
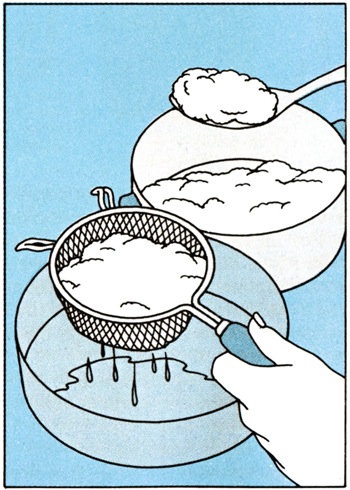
Place the pulp in a strainer. Tap it several times to shake out water, then squeeze it gently until the pulp is a soft, moist lump.
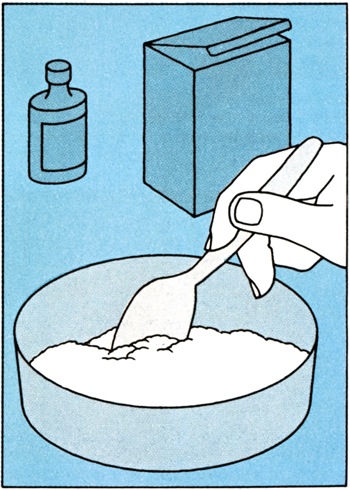
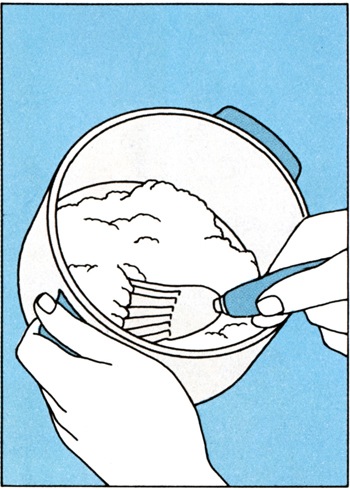
Step 4 – Add Glue and Paste Then Stir
Put the pulp into a bowl. Stir in 2 tablespoons full of liquid white glue (PVA) then 2 tablespoons full of wallpaper paste. Stir until the mixture is no longer lumpy.
Papier-Maché or Paper Mache in American History
Papier-mâché literally means chewed paper, and it historically has involved various complicated techniques and materials. Paper in pulp, strips, or sheet form was held together with binders such as hide glue or natural resins.
Fillers were added to the paper and glue mix to give a smoother surface or add strength. Papier-mâché is lightweight, hard, and strong, and some types could be worked like wood. Pieces were finished using lacquer, inlay, paint, or varnish.
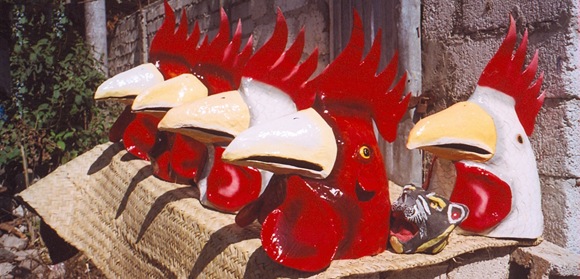
The earliest known examples of papier-mâché are pot lids and helmets from China’s Han Dynasty (B.C. 202-220 A.D.) and a falcon’s coffin from Persia. Both purely decorative items such as carnival masks and Halloween decorations and functional objects such as tables, chairs, trays, and eyeglass cases were produced.
This extract from The Smithsonian
Reference: Readers Digest Crafts & Hobbies – A Step-by-Step guide to Creative Skills.
& Wiki Commons.


One Response
Basket Making An Ancient Craft - Crafting DIY
[…] Paper mache Ideas 4 Easy Steps […]