How to Make Fabric Covered Plates
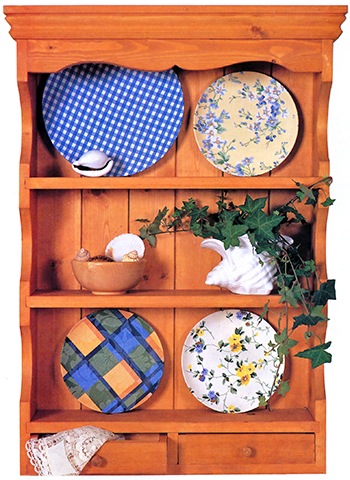
On close inspection you can see that these unusual plates are covered with furnishing fabrics. Friends will find it amazing that you have managed to find plates to match your soft furnishings exactly.
Fabric covered plates, grouped together on a wall, make a magnificent display. They are also a perfect way of giving odd or slightly damaged plates a new lease of life while showing off your favorite scraps of fabric.
If you do not have any scraps around the house, buy remnants especially for the purpose to make a collection that co-ordinates. Cover flat or shallow plates only and pick round or oval shapes, you will find plates with corners or shaped edges difficult to cover.
If you are going to use a light colored fabric, choose either a white plate or one with a pale pattern. Closely woven dress or furnishing fabrics that are light to medium-weight, non-stretch and do not fray easily are ideal for plate covering.
If you have recently made curtains or have had some soft covers made use any remaining fabric to cover some plates, then organize your collection of remnants around these to create a look that will complete the room.
Materials you will need for fabric covered plates
Plate flat or shallow
Dress or furnishing fabric 15cm (6in) larger all round than plate
PVA glue
Paint brush 2.5cm(1in) wide
Jelly jar or bowl for glue
Scissors
Soft pencil
Mug, jelly jar or flower Pot for stand
Here is How to Make Fabric Covered Plates step by step

To co-ordinate remnant-covered plates, choose fabrics with a distinct linking theme such as a color or a motif like these three flower prints.
1. Cutting the fabric
Working on a flat, washable surface, smooth the fabric out and position the plate face down on to the fabric, framing any motifs or section of pattern you wish to show off. Using the pencil lightly draw a line around the plate leaving a border the width of the plate from rim to center. Using scissors, cut along the drawn line.
2. Pasting the fabric
Add 1 part of water to 2 parts of PVA glue in a jar and stir until mixed. Using the brush, paint glue mix over the top of the plate. Lay fabric, wrong side down, centrally over the plate and smooth the fabric from the center outwards. Paint another layer of glue over the fabric and smooth out, pressing well into the contours of the plate.
3. Neaten the fabric allowance
Turn the plate over and cut the fabric allowance almost up to the plate edge, at 2.5cm (1in) intervals. Paint glue mix over the back of the plate and wrong side of each fabric allowance section. Press each alternate section to the back of the plate, working around until all the flaps are in place. Brush another layer of paste over the surface and smooth the fabric sections again.
4. Checking for air bubbles
Turn the plate over and check fabric is still smooth. Press out any air bubbles and dampen with another coat of glue mix if necessary.
5. Trimming the fabric
When the plate is finished, trim away any excess fabric to make a neat circle at the back. Balance the plate on the stand and leave to dry for at least twelve hours.
Reference: The Country Look—Decor & Crafts




6 Responses
Stunning String Art With 9 Steps - Crafting DIY
[…] Fabric Covered Plates in 5 Easy Steps […]
Stunning Fabric Printing To Try - Crafting DIY
[…] Fabric Covered Plates in 5 Easy Steps […]
How to Make Piped Cushions In 8 Steps - Crafting DIY
[…] Fabric Covered Plates in 5 Easy Steps […]
Buttoned Cushions – 4 Easy Steps - Crafting DIY
[…] Fabric Covered Plates in 5 Easy Steps […]
12 steps to ReUpholster a Drop-in Seat - Crafting DIY
[…] handling, and it may be that only the top layer of fabric needs to be replaced. Just 1m (1yd) of fabric or less will be enough to cover most chairs, and if the fabric has only a small or random pattern, this amount may be enough to […]
Malcolm Hudson
I am starting a project to make an old looking sketchbook/journal.
I want to make it as authentic looking as possible and i have reached the point where i would like to have writing on the front.
I have a thick fabric that is ready to go on, but i would like to add words/detailing.
How were words added on old books? Does anyone have any other suggestions of ways i could do it?
Many many thanks, Dan 🙂