How to Make a Dough Basket

This easy to make dough basket, which hangs on the wall, is the perfect framework for long-lasting displays of dried or silk flowers.
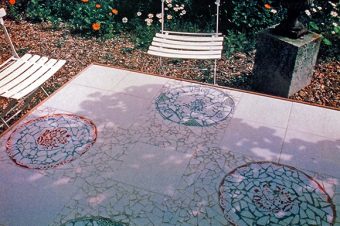
This is how to make a dough basket the easy way. This charming wall basket, overflowing with foliage and flowers is the perfect decoration for a country home. Made from salt dough and baked in the oven the basket makes the ideal framework for a long-lasting winter display, using either silk or dried material.
Salt dough is a surprisingly good modeling material. It’s cheap and easily made from store cupboard ingredients and the high salt content, along with the glycerine. ensures the dough has a firm consistency which won’t crumble. This basket is constructed over a mound of crumpled kitchen foil, using short lengths of dough, molded and overlapped to create a traditional basket-weave pattern. Here are a few more shapes and types of basket for you to look at.
Decide on the location for your basket display and choose flowers and foliage to suit the room scheme. Then when necessary, you can re-arrange the display to suit the time of year. For example, in the main picture the purple flowers can be substituted by red berries for a festive Christmas display.
Materials
Plain superfine flour 240g (8oz)
Salt 180g (6oz)
Glycerine 2 tsp
Gloss varnish
Kitchen foil
Mixing bowls 20-23cm (8-9in) across for mould and larger one for mixing the dough
Pastry board, rolling pin and baking tray
Selection of silk or dried seed pods, berries and flowers
Florist’s wire
Florist’s foam, for dried flowers
Clear adhesive
How to Make the Dough Basket

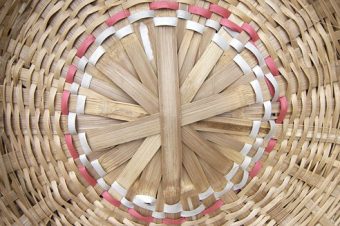
Here is the finished basket ready for decorating with flowers. Note that the overlapping basket weave is not perfect and this just adds to the charm of the country look.
1. Mixing the dough
Mix the salt, flour and glycerine together in the large mixing bowl. Add some water, a little at a time and combine until the dough leaves the sides of the bowl and forms a ball. Knead the dough for several minutes until it is smooth and pliable. Cover with cling wrap.
2. Creating a mold
Line the small mixing bowl with a sheet of foil, so it overlaps the rim. Scrunch up more foil and press firmly into half of the bowl until it reaches the top. Fold foil sheet around the crumpled pieces; remove from bowl.
3. Forming the back
Place a portion of the dough on the pastry board. Roll it out to a 6mm (1/4 in) thickness. Place the mold flat side down on the dough and cut round, leaving a 1cm (3/8 in) border all round. Place both on the baking tray.
4. Beginning the basket
Mark a dotted line down the center of the foil mold, then one on either side 2.5cm (1 in) apart. Roll a small piece of dough into along sausage shape, 6mm (1/4 in) in diameter and 14cm (5 1/2 in) long. Lay this vertically. Roll out a similar shape and cut into 5 cm (2in) strips. Lay these horizontally over the vertical strip between the vertical lines, leaving similar sized gaps in between.
5. Starting to weave
Roll out another dough strip the same size as before and lay it vertically along the next line covering the ends of the short horizontal strips. Then cut more short strips in the same way as before and lay them horizontally over the next line placing them in the gaps left in the previous row, creating a basket weave effect.
6. Dealing with edges
Continue to work the dough strips across the right-hand side of the foil mold in the same way, graduating the pattern to fit around the mold until you reach the outside edge. Trim and stick the ends of each strip to the dough base with a little water.
7. Weaving the left side
Starting with a long dough strip placed along line to the left, repeat the same pattern across the basket in the opposite direction, so the pattern will match across the whole basket. Trim and stick the ends to the dough base with water.
8. Adding a handle
Roll out two thicker sausage shaped strips 38cm (15in) long. Twist the two lengths together to form the basket handle. Lay on the baking tray and press ends into the inside of the basket.
9. Finishing off
To neaten the top, roll out two 38cm (15in) long sausage shaped strips. Twist them together and lay over the top of the weaving, Trim ends to fit and stick to base. Roll two 7cm (2 ¾ in) long sausage shaped strips and twist together to form the basket base. Stick to base trimming back carefully to fit.
10. Baking the dough basket
Preheat the oven to 110ºC/225ºF/Gas Mark 2. Place the tray with the dough basket in the oven. Bake for 4-5 hours, or 3-4 hours for a fan-assisted oven. Check that the dough is baked hard. Remove from oven and leave to dry for 2-3days. Carefully remove the foil, using tweezers.
11. Varnishing the basket
When completely dry, paint with two coats of varnish, allowing the basket to dry between each coat.
12. Decorating the basket
Cut and wedge the florist’s foam to fit into the basket. Fill the basket with dried or silk flowers and foliage. Position the largest flowers and leaves first to form the basic framework of the arrangement, then fill in with the remaining material. If the flower or leaf stems are too short or brittle and break, use fine florist’s wire and foam to secure the flowers and leaves into the foam. To create a cascading arrangement stick a few sprigs of foliage on to or through the basket-weave.
Reference: The Country Look—Decor & Crafts


6 Responses
turg143
Actually you can do more than just that. You are supposed to weave a basket look to the bread dough and then grease a muffin tin and when they are baked up they look like a basket then drop a raw egg in center and bake for 20 minutes. My Mom made them when I was younger I am 65 yrs young. 🙂 thanks for the recipe though 🙂
Courtney
To make a good, light, foamy bread? I’m using the best unbleached white flour available, and the right amount of good quality yeast. I did, however, cheat a little and add some sugar, violating the “French” rule.
Should it rise 100% (double original volume)? 200% ?
More? Less? How much is a successful rise?
.
therundown2k3
Moms
What is going in your child’s Easter Basket this year?
Were leaving for vacation day after tomorrow for a week so I haven’t even thought about Easter or bought anything. Last year I bought the usual and filled my 2 year old daughters basket with bubbles, sidewalk chalk, play dough, etc and she still has all of it left over from last year and the year before…so needless to say, we don’t need anymore of it around the house and I don’t want to buy anymore lol. I have no idea on what to buy. I know i’ll probably pick her up a dvd or two, but i’m lost on anything else. Any ideas?
Janek
You can try with the powder, the cookies might not rise as much as you expect.
SteveO
I accidentally purchased baking powder by mistake and not baking soda so I am wanting to create chocolate cookies. Going back to the shop is not a choice thus may I utilize the powser rather? Or do I merely skip the entire thing plus hope they turn out okay??
I meant chocolate chip cookies
I could have really purchased the home cookies which are nicely prepared plus cut up inside squares *sighs* Oh effectively.
Sophia C
I live on a fixed money plus have been creating Breads by hand for years. I am retired yet require the small amount of money my Breads bring. I wish a Bread machine which has 2 blades, will it create different breads, yet have a fair price. Can someone help?