How to Make a Webbing Cushion
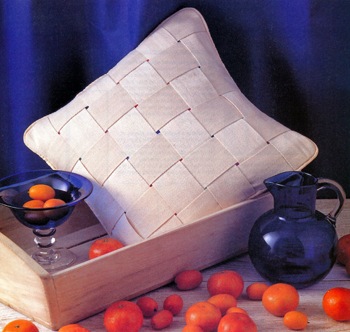
The neutral color for the webbing on this cushion makes it ideal for almost any color scheme. Here the webbing cushion acts as a foil to bring out the other richer colors nearby. The webbing cushion looks particularly dramatic teamed with the vivid orange tangerines and oranges, and the bright blue glass bowl and jug. If you decide you want a brighter colored cushion, simply dye the webbing with a fabric dye before weaving.
Here is how to make a webbing cushion cover.
Just a hint of color peeps out from between these bands of simple cotton webbing, providing an understated, but stunning webbing cushion cover. The natural colorway will blend into any color scheme and the small spots of color can be changed to match or contrast with your decor.
The front of the cover is created by weaving strips of cotton webbing over a plain background. The tiny spots of color are created with small squares of fabric or ribbon fused to the background behind the webbing strands. The cushion is completed with a neat piped edge and fastens at the back with ties.
You could make several cushions with different colors peeping through to use as throw cushions on a sofa, or match the spots of color to your bedspread and use them as bedroom cushions.
The finished cushion cover measures approximately 32cm (12 ½ in) square.
Making the Webbing Cushion
Materials
Ecru webbing 4.40m x 5cm (4 7/8 yds 2 in)
Lightweight fusible interfacing 36cm (14 in) square
Brightly colored ribbon or fabric twenty-five pieces 2cm (3/4 in) square
Backing fabric 90 x 36cm (36 x 14 in)
Piping cord 1.4m (1 5/8 yd)
Ribbon 1m x 1cm (1 1/8 yd x 3/8 in)
Cushion pad to fit cover
Sewing thread to matching the webbing
1. Laying out the webbing
Cut the webbing into twelve 36cm (14in) long strips. Pin six webbing pieces vertically on to a board, with a gap of 6mm (1/4 in) between each strip.
2. Weaving the first strand
Leaving a margin of 1.5cm (5/8 in) at the top, weave one piece of webbing horizontally over and under each vertical piece of webbing. Check that there is a 1.5cm (5/8 in) margin at each end and pin the webbing securely in that position.
3. Weaving in remaining strips
Leaving a gap of 6mm (1/4 in) weave a second strip below the first one, this time weaving under and over each piece of webbing; pin at each end. Repeat, to weave all the remaining pieces of webbing through the vertical strips. Pin all free ends to secure.
4. Adding colored squares
Position a square of colored ribbon or piece of fabric right side down over each 6mm (1/4 in) hole, so they are completely covered. Lay interfacing centrally, shiny side down over the top. Fuse in position with a hot iron. Machine stitch round the webbed cushion front 1.5cm (5/8 in) from the outer edges.
5. Making a back
Cut two pieces of backing fabric each 36 x 22cm (14 x 8 ¾ in). Turn under a double 1cm (3/8 in) hem on one long edge of each piece. Right side up, overlap hemmed edges for 3.5cm (1 3/8 in) to form a square; pin and tack together.
6. Adding ribbon ties
Divide back section into three and mark on the overlapping edge. Cut the ribbon into four equal lengths. Turn under raw end of one ribbon and place at one marked position over hemmed edge. Place second ribbon at second mark. Pin and top stitch ends in place.
7. Complete the fastenings
Turn under the ends of the remaining ribbons and position on the opposite back cover in line with the two previous lengths. Tie the ribbons together across the back opening. Trim the free ends of ribbon diagonally.
8. Making up piping
Cut out bias strips from the remaining backing fabric and cover the piping cord. Position the covered piping cord all round the cushion front over the stitched line, with the piping facing inwards. Join the piping centrally in one side to fit. Pin and stitch the piping in place following the previous stitching.
9. Stitching the cover together
Place the back centrally over the front with the right sides together. Pin, tack and stitch together all round, just inside previous stitching. Trim the corners and seams. Undo the ribbons and turn the cover right side out. Insert a cushion pad and re-tie the ribbons across the back.
Reference: The Country Look—Decor & Crafts


Leave a Reply