How to Make a Rose Stenciled Tray

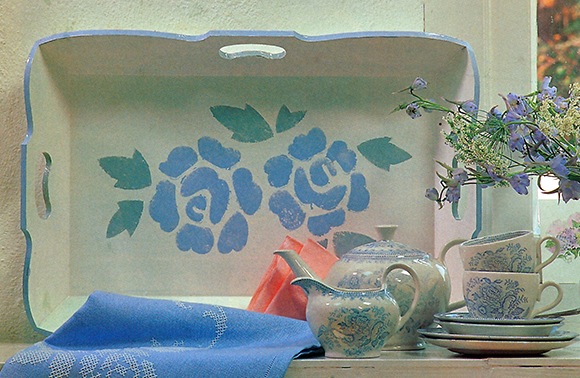
Choose colors for the tray which will blend with your kitchen. Here the stencil has been painted blue and green on a white background to fit in with the crockery.
Painting a stenciled tray can give it a new lease of life, it also makes an attractive and very useful accessory to display in your kitchen. This stenciled tray is made from wood, but metal trays can be painted and stenciled in the same way, using a suitable metal paint. If you wish to continue the theme you could reduce the size of the motif and paint it around the kitchen walls above the tiles or along the top of the walls to match your stenciled tray.
Materials

These are some of the tools and materials that you might need to complete your stenciled tray.
Tray Primer and emulsion paint or metal equivalent
Stencil or poster paints two colors in small pots
Clear varnish
Paint brushes two 5cm (2in) for applying paint and varnish, and a fine brush for painting the rim of the tray
Stencil brush
Craft knife and masking tape
Stencil card made from waxed or oil-coated paper or acetate
Cutting board or a thick piece of card to protect work surface
Fine grit sandpaper 00 grade
Stencil a Tray
1. Apply the primer
With the fine grit sandpaper, rubdown the tray to ensure a smooth surface to work on. Apply a coat of primer and leave to dry. Rub with glass paper.
2. Apply the emulsion
Apply three coats of emulsion. After each coat has been left until it is completely dry, rub down with the fine grit sandpaper.
3. Making the stencil
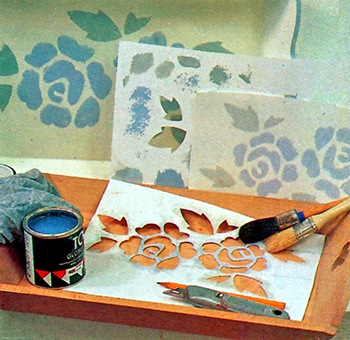
Draw the motif, copied from the photograph above, on to the acetate or stencil paper, enlarging if necessary to fit the tray. Cut out the motif carefully with the craft knife.
4. Practice using the stencil
It is a good idea to practice using the stencil on a piece of paper. You can use the test piece to decide the best position for the motif on the tray.
5. Painting the motif
Position the stencil on the tray and fix in place with the masking tape. Mask out areas to be stenciled in the second color. Prepare and apply the paint using the stencil.
6. Finishing touch
With the blue paint and using a fine paint brush, paint the rim inside the handles and around the top of the tray.
7. Varnish the tray
When the paint is completely dry, apply several coats of varnish and, allowing it to dry thoroughly between each coat, rub down with fine grit sandpaper between each coat.
Reference: The Country Look—Decor & Crafts


2 Responses
How to Stencil the Easy Way - Crafting DIY
[…] Easy 7 Steps Rose Stenciled Tray […]
Paul M
I am sure there is someone out there that can help. I have a light purple room with brown hard wood floors. What cute room decor do you suggest that I should get?