How to Make a Cockerel Collage
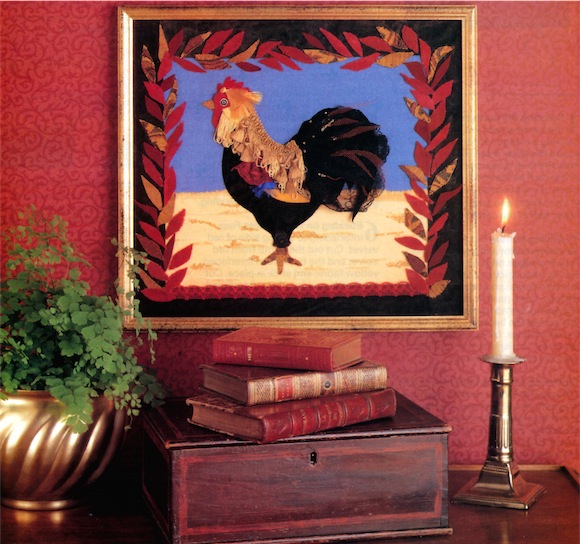
By building up pieces of differently textured fabric a layer at a time, a rich effect is achieved without effort. The colors of the cockerel collage are brought out by the red and gold leaves positioned around the edge.
Collect your fabric scraps together, and create a colorful cockerel collage of a farmyard favorite. Our lively rooster, set against a background of bead-strewn millet and blue sky, looks larger than life and ready to crow. His plumage is composed of layers of black velvet and net, with strips of braid and beads. His comb and wattle are made from red velvet and he has a bright sequin eye.
Fabric collage is a quick and easy craft, and any materials can be used. Choose a firm outline, such as this cockerel, and build up the picture using oddments of fabric, adding beads and sequins to the final picture.
Making the Cockerel Collage
Materials for the Cockerel Collage
Stiff card 35 x 40cm (14 x 16 in) for backing
Blue textured fabric 32 x 18 cm (12 1/2 x 7 in) for the sky
Yellow cotton fabric 32 x 20 cm (12 1/2 x 8 in) for the ground
Black net lace 30 x 10 cm (12 x 14 in)
Fabric scraps including black velvet, red velvet, red, gold, blue and yellow for the rooster
Yellow/gold fringing 3 x 50cm (1 ¼ x 20 in)
Green velvet 40 x 24cm (16 x 9 ½ in) for border
Orange net 10cm (4in) square
Fusible interfacing
Spray adhesive
Fabric adhesive
Small gold glass beads
Large sequins one white and one black and small gold sequin for eye
Red braid 1.3 x 30cm (1/2 x 12in) for border
1. Creating the background
Spray the backing card with adhesive. Leaving a margin of 3cm (1 ¼ in) all round the outer edge of the card, stick the blue fabric over the top half of the card and smooth down. Cut a piece of yellow cotton 32 x 11cm (12 ½ x 4 ½ in) and smooth over the lower half of the card, butting edges.
2. Adding texture
Cut small strips of yellow cotton with wavy edges. Fray the edges on the outward curves, then stick over the ground fabric to create an uneven textured surface. Cut a narrow strip 32cm(12 ½ in) long and fray top edge. Stick this across the background between the two fabrics, frayed edge upwards, to disguise the join. Stick gold beads over the fabric.
3. Making the template
Draw up a template for the rooster from the photograph. Fuse a piece of interfacing to wrong side of black velvet. Cut out the rooster from the interfaced black velvet. Stick in place centrally over the background.
4. Adding a tail
Cut one lower body from black net; cut into the lower edge to form strips and stick over the black velvet body. Using the template as a guide, cut a length of black lace net twice as long as the tail. Gather up the raw edge and, following the template for position, stick over the tail. Cut curved strips of orange net and stick these into the folds of the tail. Stick gold beads among the tail fabrics.
5. Making up the wing
Fuse interfacing to wrong side of yellow fabric and cut out one complete wing. Stick wing in place, following template for position. Cut two more sections from red and blue fabrics, using the template as a guide, and stick over the yellow wing.
6. Sticking on the features
Fuse interfacing to wrong side of red velvet. Cut out the comb from red velvet and the beak from interfaced yellow fabric and stick in place. Cut the wattle and face from interfaced red velvet and stick in place. Make up the eye by sticking the gold sequin over the black sequin, and stick this to the white sequin. Stick in place to the face.
7. Decorating the bird
Stick strips of braid down the head, neck and back of the rooster. Use two or three graduating layers to achieve a rich, feathery look. Cut three tassels from some braid and stick to the head. Cut out the foot from interfaced brown patterned fabric and stick to the base of the rooster. Cover the join with a small scrap of black net.
8. Adding a border
Fuse interfacing to the wrong side of the green velvet. Cut 6 cm (2 ½ in) wide strips of green velvet and stick on to the edge of the card, covering the background edges. Cut a length of red braid and stick across the base edge of the border. Fuse interfacing to the wrong side of red, yellow and brown fabrics and cut out about seventy-five leaf shapes. Stick the leaves round the inner edge of green border on the side and top edges, covering edges of red braid.
Reference: The Country Look—Decor & Crafts


Leave a Reply