Making a Découpage Box

Several layers of varnish have been built up to give an antique look to the box.
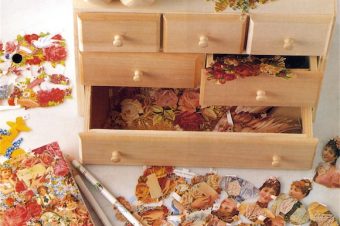
Découpage has transformed this light plywood box into an attractive jewelry box. The pansies have been cut from a sheet of good-quality gift wrap.
When choosing a box to decorate with découpage, make sure it has a loose-fitting lid as several layers of varnish brushed over the motifs will make it impossible to replace a well-fitting lid. Otherwise you will have to restrict the decoration on the sides to below the lid when it is in position.
When planning the design try to continue the motifs on the top over onto the sides of the lid.
You could add motifs to the inside of the box as well, or simply paint the inner surfaces and add a layer of tissue or cotton wool.
Making a Découpage Box Step-By-Step
Materials
Small unvarnished wooden box with a loose-fitting lid. The layers of varnish may make it difficult to fit a tight-fitting lid.
Floral wrapping paper, one sheet should be sufficient for a small box.
Glasspaper, sanding block with medium and fine glasspaper (very fine sandpaper).
Wire wool, 000 grade.
Varnish with clear satin finish.
Paint, household emulsion, in color to match background of wrapping paper.
Paint brushes, 12mm (1/2in) or finer for applying glue, paint and varnish.
Manicure scissors.
Transparent craft glue
Clear wax polish
Wallpaper seam roller
1. Preparing the surface
Using a sanding block and medium grade glasspaper (very fine sandpaper), rub down the surface of the box. Wipe off the dust.
2. Seal the surface
Paint the box and lid with a coat of emulsion paint and leave to dry for at least six hours. Lightly rub over the surface with fine glasspaper (very fine sandpaper).
3. Preparing the motifs
Select the flower motifs and carefully cut round each one using a pair of manicure scissors held at a slight angle. This will bevel the edge and help the paper blend into the background. Cut out enough shapes to provide a generous collection to choose from when designing.
4. Work out the design
Draw round the lid on a sheet of paper and lay out the cut shapes, moving them about until the arrangement pleases you. Shapes can be overlapped and some of the plain background can show in between the motifs as part of the design.
5. Sticking the shapes in place
Stick the largest shapes in place first. Spread the wrong side evenly with glue and press in place. On overlapping sections, leave the edge unstuck so the next shape can slide underneath. Place a sheet of plain white paper over the shape and gently roll it flat with a wallpaper seam roller. Clean off any excess glue squeezed out.
6. Completing the design
Continue adding more shapes in the same way. If possible arrange the design so the shapes reach over the edge of both base and lid.
7. Varnishing the design
When all the shapes have been securely stuck in place and the glue has dried, apply a coat of varnish. Use varnish sparingly, brushing in one direction. Leave to dry overnight. When dry, add a second coat, brushing in a different direction, and leave to dry overnight.
8. Adding extra layers of varnish
When dry, lightly rub all over with fine glasspaper (very fine sandpaper) and wipe away the dust. Continue varnishing and lightly rubbing until you have coated the box pieces with between ten and 20 layers of varnish, each brushed in a different direction. The box is complete when the edges of the shapes are smooth to the touch under the layers of varnish.
9. Final coat
Finally rub over the surface very gently with fine wire wool. Polish the surface with wax polish using a soft cloth.
What is Découpage?
decoupage, (French: “cutting out”), the art of cutting and pasting cutouts to simulate painting on a wood, metal, or glass surface. There are many variations in technique, but the four basic steps of decoupage generally are cutting out the pictures, arranging them to depict a scene or tell a story.
Source: Brittanica
Reference: The Country Look—Decor & Crafts


2 Responses
Janek
No problem, as we say in our post, after a rub down with some glasspaper then coat the box with a coat of emulsion paint and let it dry first.
Only Business
Is it possible to decoupage pictures on to a small keepsake box, it is made of wood.