Keep Your Keys All Framed Up With a Wire Keys Frame
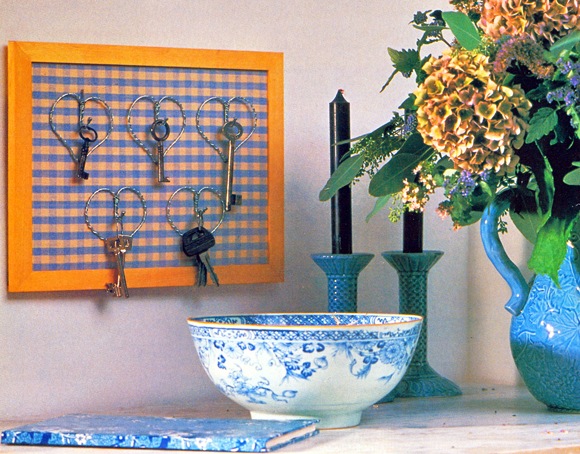
There will be no excuse for having lost keys with this handy wire keys frame key holder. Hang it in a prominent position so it’s quick to check whether the keys are in or out of the house. Choose a pretty fresh fabric, and match the background color to the location.
Keep all your keys together and within easy reach on a wire keys frame smart key holder. This one costs almost nothing to make if you have an old picture frame, a scrap of fabric and some bendable wire.
The heart-shapes are made from cut lengths of wire and bent into shape then placed against the gingham fabric back-ground.
The key hooks are cleverly held in place by finer wire which binds round the heart. The wire ends are twisted together and go though the fabric and backing board to bend back on the wrong side of the wire keys frame.
The fabric itself is tightly stretched over a firm backing board and the whole key collection is housed inside a plain wood picture frame. The hard metal hooks against a soft fabric back-ground make an interesting combination of materials and the backdrop can be changed to fit in with the decor of the kitchen or hallway.
If you prefer not to construct the hooks yourself make an arrangement using small decorative picture hooks instead – choose similar sized hooks then group them together over the fabric. The picture frame can be painted to match the fabric or decor or decorated with patterned wallpaper.
Making the Wire Hearts Key Holder
Materials
Wire 1.5mm thick and 0.7mm thick
Picture frame with card backing board measuring about 23 x 79cm (9 x7 ½ in)
Blue gingham fabric 33 x 29cm (13 x11 ½ in)
Felt or curtain interlining 23 x 19cm (9 x7 ½ in)
Strong thread and needle for lacing
Bradawl
1. Forming the heart
Using a 20cm (8 in) length of thicker wire, bend it into the shape of a heart, using the actual-size heart shape as a guide. Find the center and use this to form the point of the heart. At the top, bend the two pieces of wire together to form a hook for the wire keys frame.
2. Binding the heart
Cut two lengths of thin wire each 50cm (20 in) long. Take the first length and beginning at the pointed end of the heart, wind the wire round the heart. Leave a 1Ocm (4 in) length of wire free at the beginning point. When the hook end is reached, wind the wire back to where the heart divides and leave the end free, trim to leave 1Ocm (4 in). Repeat, to bind the opposite side of the heart in the same way, but only up to the top, do not bind the hook section with the second wire; wind the two pairs of free wires together.
3. Fixing the hearts in place
Make up five hearts in the same way. Position the hearts, evenly-spaced, on to the backing card with a row of three and a row of two as shown. Mark the positions of top and bottom twisted wires of each heart on to the backing board. Then using a bradawl and working from the front make a hole at each marked position through to the back of the card. Thread the free ends of twisted wire through the holes; twist together and bend back against the back of the board to hold the hooks firmly in place. Next you can hang your wire keys frame up where it is most handy.
>
>
>
Reference: The Country Look—Decor & Crafts


Leave a Reply