How to Do Tie-dyeing

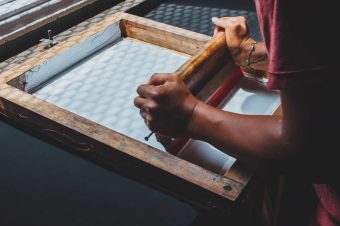
Tie-dyeing is a simple process. Areas of the fabric are tied off in accordance with your design. (“Tying” is a general term that includes knotting and sewing.) The fabric is then dyed and rinsed, and the ties are removed.
The tied areas resist the dye and remain the color of the original fabric. The fabric can then be re-tied and re-dyed as described in subsequent paragraphs.
Which areas you tie off and the kind of ties you use depend on the design you have in mind, but a tie-dye design need not be as carefully planned as a batik design.
Tying off areas at random often produces results as interesting as tying the fabric according to a specific prepared plan.
In fact, the unpredictability of tie-dyeing is perhaps its most exciting aspect. Although two different pieces of fabric may ostensibly be tied the same way, they will never look quite the same after they have been dyed.
One reason is that there are bound to be slightly different folds in the two fabrics. It is also virtually impossible to tie off areas with exactly the same degree of tension.
Nevertheless, there are certain standard methods of tying that will produce approximately the same results every time you use them.
Some of these methods are shown below. However, there is no end to the number of possible ways a piece of fabric can be tied or the ways in which different kinds of ties can be combined.
Fine fabrics are most commonly used in tie-dyeing. These include unbleached silk, linen, and various types of cotton. As with batik (see our batik page), the fabric should first be washed to remove the sizing.
When using chemical dyes, follow the instructions on the package. In the case of natural dyes, immerse the fabric in a simmering dye bath.
Although the total time of immersion will vary according to the dye, the process often requires no more than a half hour to an hour.
Tie-dyed articles are commonly over-dyed. This means that the fabric is dyed with more than one color dye. If you are going to attempt this technique then start with your lighter colors and work to the darker ones.
Choose colors that will combine well. For example, you could start with yellow, then if your second dye color is blue then the over-dyed areas will be green. And if you did a final dye bath of red then the colors that you will produce will be orange, purple and brown.
After the first dyeing the fabric must be rinsed thoroughly. The first set of ties is then removed or left on, depending on your design, and new ties are applied.
Then the fabric is dyed for the second time. The whole process, including rinsing, is repeated for each dyeing.
Easy Tie-Dyeing Step-By-Steps
Step 1.
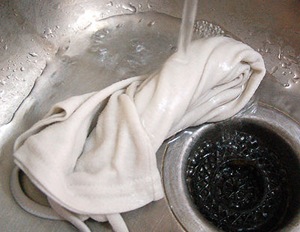
Get a T-shirt (ideally white cotton), colored dye, elastic bands (the number of bands depends on the number of rings you want to create) and a small amount of soap. Get yourself set-up near to a water supply possibly your kitchen sink area. Rinse the fabric in water and soap, then wring out well.
Step 2.
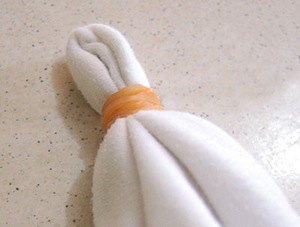
Pinch about 1 inch (25mm) of the fabric at the center of the T-shirt and gather into a point. Then about an inch or two down from the point wind an elastic band around the fabric and tie tightly.
Step 3.
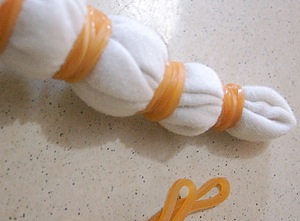
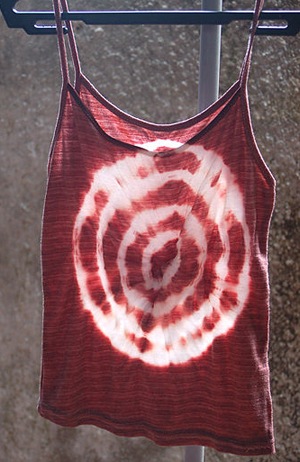
Carry on tying more elastic bands keeping them about one inch apart. You can tie as many as you like. This method will result in a circular pattern on the T-shirt.
Step 4.
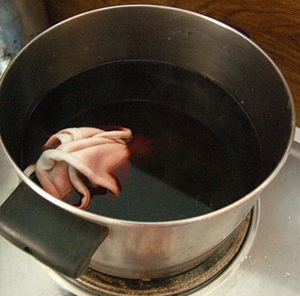
Closely follow the instructions included with the dye that you purchased. Then soak the fabric in the dye, usually with salt included, and boiling water mixture.
Step 5.
After the time specified in the instructions, rinse the T-shirt well in clean water. Keep rinsing until the water from the squeezed fabric runs clear. Wring the fabric out and hang out to dry.
How to get Different Patterns

If you want to make vertical stripes. Lay your T-shirt out flat on a table. Roll it from the bottom hem to the neck, so that you end up with a tight sausage shape.
Now use your rubber bands to tightly tie loops around the shirt roll, space these apart as you feel you would like the finished stripes to be. If you only want a few stripes then space out the rubber band ties so that there are three or less.
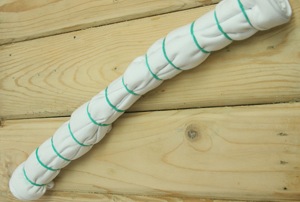
And for a lot of stripes, use a dozen or more ties around the shirt.
For horizontal stripes you must tightly roll the shirt sideways from left to right and tie the rubber bands along this way, again as many as you would like to see.

University of Florida—Peace, Love and Tie-dye
A fun article all about tie-dyeing: iml.jou.ufl.edu-projects-Spring09-history
Reference: Readers Digest Crafts & Hobbies – A Step-by-Step guide to Creative Skills.
& Wiki Commons.
12 Responses
Batik - How To Make One In 6 steps - Crafting DIY
[…] How to Tie-Dye […]
Dr Dorian
How do you tie dye things? like shirts and stuff…a list of materials and steps would be great
Michael C
I am going to tie dye a white 100% cotton tank top and i want the design to turn out like this-
http://mcdonaldobservatory.org/giftshop/product_images/tydye.jpg
How do you tie the tank top to look like that?
Also
What are the best brands and dies to use? I am looking for really bright neon colors, preferably avilable at
Micheals
Craft Wear House
Grocery Stores
WalMart
Thanks!
Willie
Tie Dye
Okay so I got a tie dye kit today an it has blue and neon in it. I want to make more colors like naturally. Is there any way I could use like the highlighter or something? And could you please tell me what kind of things will make that color? Like if I use strawberries or like lime what color will it be? do the homemade dyes last a long time? Could I make dye with paint? Could I make dye with markers? I don’t want to spend more money on stuff my mom Dosent let me :C so any good home remedies or any really cheap stuff will work. Also could I mix neon and blue to creat a color? I just want more colors I need to know how to make them. And which method will last the longest and be the brightest.
RxP DarkBox
I have been tie dyeing a while now but a couple days ago i purchased some rit dye, soda ash and cotton shirts. My creations are beautifully colored, even when i open them. The problem is when i take them out of the wash they are not as bright and the once extremely bright yellow and oranges fade almost completely. i only use cold water, no soap. What am i doing wrong? is it possibly i have to wash them with the rubber bands on? Or maybe they have to stay in their bags longer than 24 hours? please help!!!!!!
Victoria T
What do you need to tie dye? I know you need rubber bands and dye but what else do you need?
Cpt Excelsior
I want to learn how to do tie-dye. I’ve done it once at a camp but I have no idea what they put the shirts in to soak for awhile before we did it. And I’m also not sure what they did to dye it or make the colors. I was just wondering if anyone knew how to make your own tie-dye. Please help. I really want to tie-dye a couple shirts. Thank You.
Janek
Rather buy some dye from your drugstore you will get more satisfying results.
Marshal
I’m planning on getting a tie dye shirt for my swim team made. Are there any standard household items that I can use as a dye?
Janek
If you used the fixer correctly then you must rinse it straight away until the water runs clear.
Janek
Our post on tie-dyeing is the quickest and cheapest way.
mmminja
I am a kindergarten instructor, plus I have to tie-dye shirts for my whole class. I’m really utilizing 1 color of dye. I have not tie-dyed before, plus seeking the quickest plus cheapest method to do this.