How To Make Sponged Flower Pots
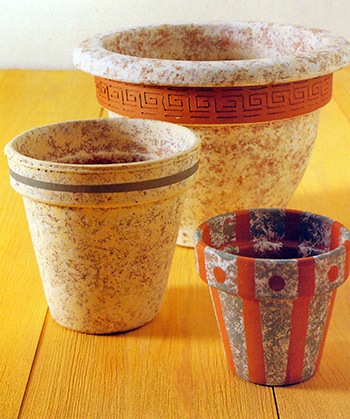
Sponging gives quick results with each pot looking slightly different.
Applying the paint with a natural sponge to achieve the sponged patterned background that adds to the overall effect and is ideal for hiding any small blemishes if the pot is slightly imperfect in any way.
The Sponged effect can look equally dramatic on its own, highlighting the textured band by leaving it unpainted, or sponging the whole pot and stenciling a motif to finish off.
Using the masking tape to create a pattern is probably the simplest method of all as you can play around with the tape as much as you want, before applying any paint.
Materials
Terracotta flower pot
Purchased stencil
Masonry paint A selection of sample pots
Kitchen towel
Masking tape
Ruler
Saucer
Pencil, crayons to match paint
White paper
Cocktail sticks for stirring the paint
Natural sea sponge
Sponging Pots
1. Preparing textured pots
If the pot has any textured bands or panels it would be a shame to cover these with sponging, so to highlight any details, cover them with masking tape, making sure that the tape is firmly stuck down at the edges to obtain crisp lines.
Masking a pattern instead of stenciling create a quick and simple, yet stunning effect using masking tape to make a pattern on the pot. Play about with the tape to achieve a pleasing result using checks, diamonds, squares, horizontal or vertical stripes, the options are endless.
Children’s stick-on shapes are also a good design idea. When you are happy with the pattern, make sure the tape is stuck down at the edges for a crisp edge to the pattern.
2. Masking a pattern
instead of stenciling create a quick and simple, yet stunning effect using masking tape to make a pattern on the pot. Play about with the tape to achieve a pleasing result using checks, diamonds, squares, horizontal or vertical stripes, the options are endless.
Children’s stick-on shapes are also a good design idea. When you are happy with the pattern, make sure the tape is stuck down at the edges for a crisp edge to the pattern.
3. Preparing the paint
Stir the paint and pour a little into the saucer.
4. Sponging the pot
Taking care not to overload the sponge, dip it into the paint and dab on to the kitchen towel to remove any excess. Sponge the pot lightly all over and leave to dry. If using two or more colors, repeat the process to achieve a soft, mottled effect. Remove masking tape unless you wish to stencil over it.
5. Stenciling the pot
If stenciling the pot wait until the sponged background is completely dry, then position the stencil and paint the motif as for a stenciled flower pot. For a finishing touch, mask off the top and bottom of the flower pot rim to paint a plain stripe. Allow to dry, then remove all masking tape.
History Of Faux Finishes Including Sponging
Faux finishing has been used for millennia, from cave painting to the tombs of ancient Egypt, but what we generally think of as faux finishing in the decorative arts began with plaster and stucco finishes in Mesopotamia over 5,000 years ago.
Faux painting became popular in classical times in the forms of faux marble, faux wood, and trompe-l’œil murals. Artists would apprentice for 10 years or more with a master faux painter before working on their own. Great recognition was awarded to artists who could actually trick viewers into believing their work was the real thing.
The 1911 Encyclopædia Britannica Eleventh Edition, in discussing the work of house and decorative painters, describes a number of faux-finishes including marbleizing and graining. Faux painting has continued to be popular throughout the ages, but experienced major resurgences in the neoclassical revival of the nineteenth century and the Art Deco styles of the 1920s. During the recent history of decorative painting, faux finishing has been mainly used in commercial and public spaces.
Extract from Wikipaedia, Thank You
Reference: The Country Look—Decor & Crafts


One Response
Beautiful Baskets - Crafting DIY
[…] make good containers for flower arrangements and also hide plastic pots decoratively. With pot plants, you need to waterproof the basket with a plastic lining or find a […]