Origami the Art of Folding Paper
We Show You How To
Origami is the ancient Japanese art of folding paper into models that represent people, animals, and plants, or into delicate abstract forms. Most traditional models are made without cutting or gluing: the Japanese word origami means “paper folding.” No one knows when or how origami was developed, but it has been a tradition in Japan for many centuries.
It was brought to Europe in the Middle Ages. Some drawings by Leonardo da Vinci seem to be of folded paper-one is remarkably like a modern paper air-plane.
In our own century origami has been used to teach architects how to deal with fiat surfaces and to teach math students solid geometry. It is also still practiced as an art throughout the world, and it never fails to delight and entertain children.
Tools and Materials for Origami

All you really need for origami are paper a flat surface and your two hands, although some models call for a drop of glue and perhaps a pair or scissors or a razor blade. Many folders believe that no tool should be used when folding.
However a couple of tools can help especially with the more complex models. One invaluable tool is a bone folder (see above) that will enable you to make “sharp” creases in the paper incredibly easily. Paper clips are also useful, as they seem to extend your fingers; and you will also find that tweezers can become a specialist tool for making smaller folds in the paper.
Any foldable paper of any size will do, but it is best to use special origami paper, which is colored on one side and white on the other. It is available at Japanese novelty stores and hobby shops. The best size is about 6 inches (15 cm)square.
Wet-folding Origami
This is an established origami technique that is used to make items that have gentle, rather than straight, geometric curves. Instead of producing flat surfaces, you will find that wet-folding produces a “softer” effect.
The way wet-folding works is that you dampen the paper to make it easier to “mould”. Then it dries, and keeps the shape you have fashioned.
This is a very effective technique for creating realstic-looking animals.
Size, an adhesive that is crisp and hard when dry, but dissolves in water when wet and becoming soft and flexible, is often applied to the paper either at the pulp stage while the paper is being formed, or on the surface of a sheet of paper that is ready for use.
he second method is known as external sizing, and it is usually executing Methylcellulose (commonly referred to as MC), some type of paste, or a suitable plant starch.
Going Beyond Origami Basics
Once you have mastered the models here, you can find other models online and in books. But better still, you can add a little imagination to your scant store of tools and materials and create your own models. Who knows? If you use enough imagination, your name may one day be revered in the Orient as that of a fine origami artist. Or at very least your work will become a family heirloom.
You Will Need The Proper Paper For Origami
Basic Origami Folds
When making a model from this post, follow the sketches and read the captions step by step. Broken lines in a sketch show you where to fold, and the completed fold is shown in the next sketch. A line made up entirely of dashes indicates that you should fold up, toward you. This is called a valley fold. A line made up of dots and dashes indicates that you should fold down, away from you. This is called a mountain fold. These folds will be shown like this:

The reverse fold is often used for animal legs, necks, and tails. Begin with doubled paper. 1. Make a valley fold where shown. 2. Unfold to the beginning position in the first step. 3. Open the paper slightly and push the corner to be folded inside. 4. Smooth down the folds

The preliminary fold is used to begin many origami figures. Start this by folding a square piece of paper in half diagonally to form a triangle. Fold the triangle in half to form a second triangle, then follow the drawings below. 1. Lift the top triangle until it is perpendicular to the bottom one. 2. Push down the upper tip, squashing it to form the shape shown in the next drawing. 3. Turn it over and repeat steps 1 & 2 on the back side. 4. The result (shown here) is the preliminary fold.

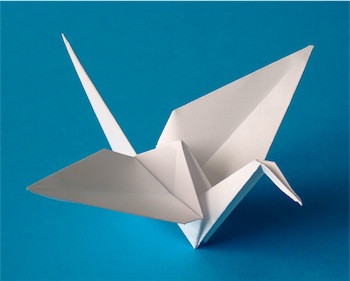
Origami Projects Working With the Bird Base
The crane is one of the many shapes that can be made from the bird base (see main picture at the top of this page). The crane is considered lucky by the Japanese. An ancient legend maintains that a magician made one that was so realistic it came to life and flew away!
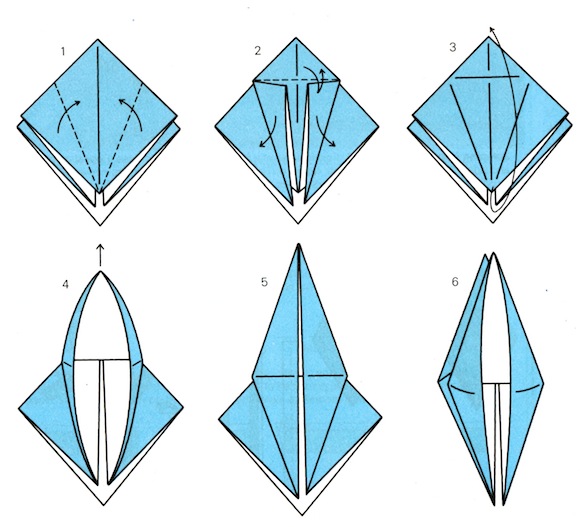
Bird Base
1. Make a preliminary fold and turn its top flaps in to the center. 2. Then unfold the flaps, and fold the top down. 3. With one hand carefully hold the bottom corner of the top sheet of paper and gently pull it towards the top of “bird”, while holding bottom layers down with your other hand. 4. Continue to pull corner up until edges come together at center-you may have to nudge creases with a finger or pull sides in if fold is stubborn. Smooth down the fold. 5. Turn your “bird” over and repeat Steps 1-4 on theother side. 6. This shows the bird base complete.
Lucky Crane
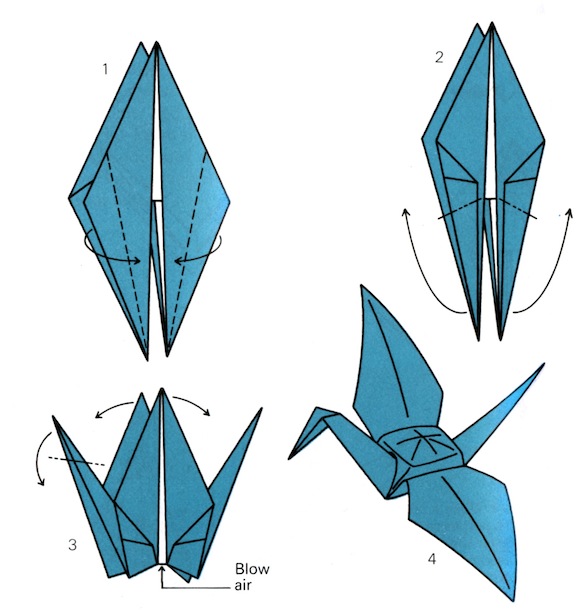
1. Fold in the sides of a bird base, at the front and the back. 2. Pull up the bottom pieces in reverse folds. 3. Make reverse fold to form a head; then gently pull wings apart and blow through the bottom to inflate. 4. This shows the crane complete.
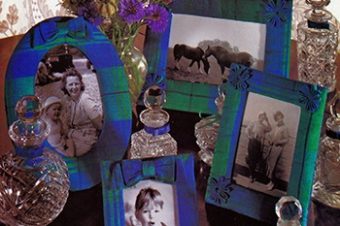
Making a Mobile
If you wish you can display your origami shapes (or models) in the form of a mobile.
Start by making a crane mobile with wire coat hangers, thread, and any number of cranes.
Clip off the tops of the hangers with wire cutters. Straighten out the rest of the wire and cut it to different lengths. Thread a needle and slip the thread through the back of the crane.
Knot the end of the thread so that it does not pull through the paper. Cut the other end of the thread and tie it to one end of a length of wire. Tie a second crane to the opposite end of the wire.
Others can be hung in between. Make a second section in the same way. Tie thread to the middle of each section and tie the other end of the thread to a longer piece of wire hanging above it.
Move the threads along the wires to balance the mobile. Make as many sections as you wish, varying the lengths of the threads and wires and the number of crane bird models.
Step-by-Step Origami Crane
This video clip might help you with making the crane pictured above.
Reference: Readers Digest Crafts & Hobbies – A Step-by-Step guide to Creative Skills.
& Wiki Commons.


2 Responses
10 Best Crafting Hobbies to Try at Home - Crafting DIY
[…] world of paper crafts offers a vast array of creative possibilities. From the intricate art of origami to the delicate beauty of quilling and the endless creativity of cardmaking, there’s a paper […]
vanvark83
Can anyone provide steps to how Origami is made?