All About Mosaics
Pictures from fragments
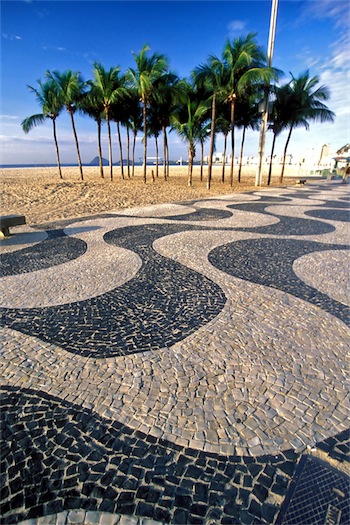
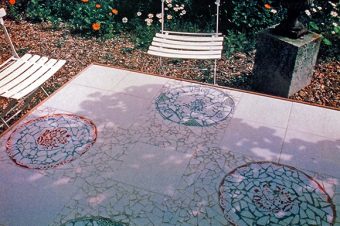
Mosaics are composed of chips and pieces of different colors of ceramic tile, glass, stones, and various other materials. From close up these fragments may make no visual sense. Viewed from a distance, however, they arrange themselves into colorful pictures or designs.
In this, mosaic technique is similar to pointillism, the 19th – century school of art in which whole scenes were painted with clusters of dots, or points, which resolve themselves into a picture only when seen from afar. Television pictures operate on the same principle: the screen actually shows only a mass of tiny dots of colored light, which appear to the – eye as a coherent moving picture.
The Origins of Mosaics
Mosaics seem to have originated in the Near East. Some 5,000 years ago in Erech, Sumeria, long terra-cotta cones with colored heads were driven into walls and columns in decorative patterns. But mosaics did not become popular until the eighth century B.C., when a good number of nonfigural mosaic floors were laid in Crete and Asia Minor.
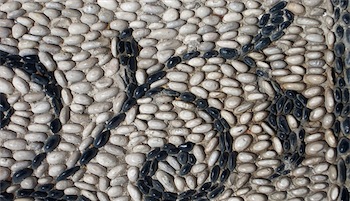
Among the earliest known figural works are 18 pebble mosaics (see example above) at Olynthus, Greece, dating back to the fourth century B.C. These mosaics which decorated the floors of private homes, depict scenes from Greek myths. One shows the hero Bellerophon astride Pegasus, the winged horse, fighting the monster Chimera.
In classical times new materials were introduced, including glass, colored marble, and limestone. Uniform rectangular pieces of material, called tesserae, were also introduced. Their rectangular shapes made it easier to fit close together.
Wall mosaics became common in the Roman Era. The mosaics discovered in the ruins of Pompeii – one of the cities destroyed by the eruption of Mount Vesuvius in A.D. 79 – incorporate great color and detail in their scenes from myth, history, and everyday life. As the Romans went about conquering the world, they brought the art of mosaics with them everywhere, from Africa to Britain.
Byzantine Mosaics

The early Christians began using mosaics in churches as early as the 4th century, and the art of mosaics reached its peak during the time of the Byzantine Empire – the 4th through the l5th centuries. The walls and ceilings of Byzantine churches were covered with great mosaics depicting scenes from the Bible and from the lives of the saints. These mosaics were important not only for their great beauty, but also for their instructional value in a largely illiterate society.
Some of the greatest examples of early Byzantine mosaics can be seen in Ravenna, Italy. The magnificent mosaics in the Hagia Sophia in Constantinople (now Istanbul) date from the 6th century to the l2th. St. Mark’s Basilica in Venice has fine examples of late Byzantine art.
Decline and revival
By the end of the 12th century Gothic architecture was taking over, and stained glass windows replaced mosaics in the churches. Thereafter, mosaics remained largely unpopular until our own time, except for a brief revival in the l9th century. Now once again they are being created with style and imagination.
Mosaics in the New World
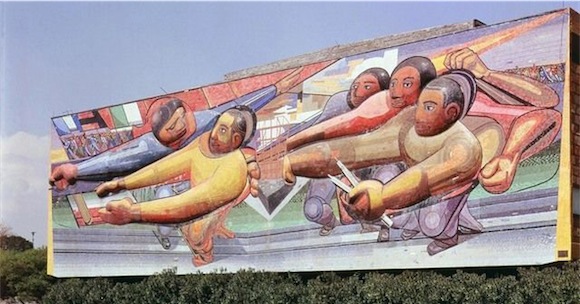
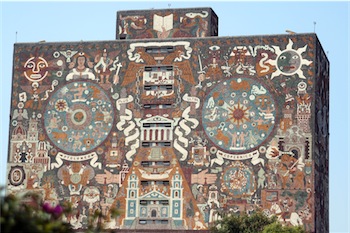
The mosaic technique was developed independently in pre-Columbian Mesoamerica by the sixth century. The Mayas and Aztecs decorated masks, shields, and helmets with mosaics of turquoise and other materials. Latin America is also a center of the current revival. The exteriors of the buildings at the University of Mexico ( see picture above) are covered with mosaics of great beauty and diversity, designed by Diego Rivera and other leading artists.
Tools and materials for Making a Mosaic
Many of the tools and materials used for mosaics are items you probably have already, such as a hammer, nails, and bits of wood. All specialty items required are described below.
Tesserae and Cutters
Mosaics are made up of small, varicolored units called tesserae – from the Latin word tessera (“four sided”). An uncut tessera is generally square or rectangular. Ceramic tiles and glass tiles are the most common tesserae, but almost any material can be used, including shells, wood, and plastic.
Glazed ceramic tiles about 3/8 inch square are available in crafts and hobby shops and in art supply stores. Commercial tesserae that may be harder to find include opaque glass tiles, porcelain tiles, and smalti (glass tiles with irregular surfaces that increase the reflective properties of the piece). Smalti resemble the tesserae used in the great Byzantine mosaics, but they are expensive. Stained glass cut to various shapes and sizes can also be used as tesserae. When handling small tesserae, use tweezers.
For cutting the tesserae You will need a good pair of tile nippers (a tool resembling pliers), which have sharp jaws for cutting ceramic or glass tiles. If you use glass in your mosaic, you will need a glass cutter. (As ceramics and glass can be dangerous to work with care must be taken and protective gear must be worn especially eye protection)
Adhesives and Grout
You can use any adhesive that will bind the materials involved. Cement is the traditional adhesive, but it makes the mosaic extremely heavy. Polyvinyl acetate (PVA), or white glue, is best for small mosaics, and it is easy to use.
After the mosaic has been Put together and glued or cemented to its backing, the spaces between the tesserae should be filled with grout – a creamy cement mixture. Buy a commercial mosaic grout or make your own by mixing 1 part lime to 5 Parts Portland cement, then stirring in water slowly until the mixture attains the consistency of sour cream. Cement dyes are also available. To color the grout, add dye to the dry ingredients.
Direct and indirect methods for Creating Mosaics
Two basic methods are used today for creating mosaics: the direct and the indirect. The methods vary only in the manner in which the tesserae are assembled and laid in the adhesive. In the direct method the tesserae are placed down one by one.
In the indirect method they are first arranged loose on another surface exactly as they will be in the finished mosaic. A frame of lathing strips is nailed around the arrangement to keep the pieces from shifting. Then a piece of tracing paper is pasted to the tops of the tesserae with water soluble paste. When the paste has dried, the entire mosaic – or a section of it if it is a large work – is lifted up and placed into position on the permanent adhesive. When this adhesive has dried, the paper is moistened and carefully removed.
General procedures For a Mosaic
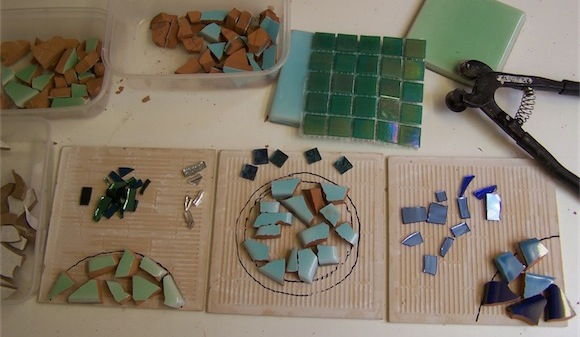
To make a mosaic by either technique, first complete your design and draw its outline full size on a piece of paper. This is called the cartoon. Cut the tiles you will be using and fit them into place on the cartoon to help you judge the spacing and overall effect. The small tesserae and the spaces between them must be manipulated to give the most pleasing appearance. Generally, if you want a lot of detail in the mosaic, you should use smaller tesserae of various shapes so that you can more easily fit them close together.
If you are using the direct method, copy the cartoon onto the surface that will be used as backing for the mosaic. Apply the adhesive to the surface, and set the tiles into place one by one. Do large mosaics one section at a time. Let the adhesive dry overnight. Then rub grout into the spaces between the tesserae, scrape off the excess, and clean the surface with a damp sponge. Let the grout dry for at least 4 hours, preferably overnight. Grout and clean the mosaic again. When the second coat of grout is dry, smooth it down with a stiff-bristled brush. Sponge the surface clean and apply liquid floor wax to the finished mosaic. These final steps are the same for both methods.
>
The Getty Conservation Institute—Conservation of Mosaics
Conservation of Mosaics in Situ is a project of the Getty Conservation Institute.
Reference: Readers Digest Crafts & Hobbies – A Step-by-Step guide to Creative Skills.
& Wiki Commons.


Leave a Reply