Make Your Own Fabric Shelves
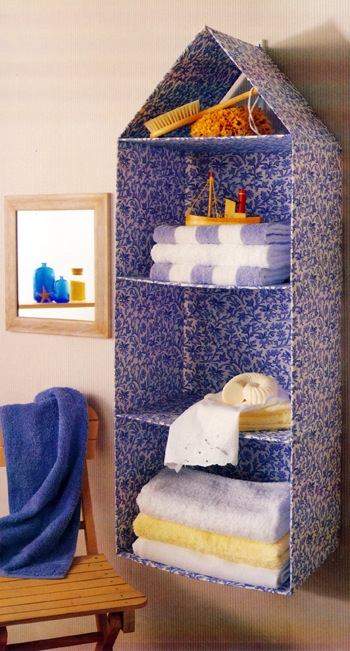
These fabric shelves are rather ingenious in its construction and will prove useful as a storage unit anywhere in the home. As the fabric shelves are enclosed in box like fashion, the towels or clothes stored there will remain neat and tidy.
Making fabric shelves is easy, here is how to make your own. For storing piles of folded soft towels and sweaters, there is nothing quite so pretty and unconstrained as this floral hanging shelf unit.
The unit is made from fabric, which is pleated to form the shape. The shelves are formed by the addition of four hardboard rectangles inserted from the back of the unit to make shelves.
The hanging shelf unit can be dismantled in minutes and packed flat for easy storage. This makes it ideal for a guest bedroom or a bathroom. Also, by removing the hardboard rectangles, a shelf unit made from washable fabric can be popped into the washing machine along with the bed linen or towels.
The fabric shelves unit is constructed in a way which allows it to be hung easily from a bracket on the wall. As this takes up no floor space at all and very little wall space. It also allows for other furniture, such as a chest or blanket box to be placed beneath it. This doubles your storage capacity and keeps clothes and linen neat and tidy.
When choosing fabrics, make sure that you select a firm, yet pretty furnishing fabric, which is machine washable and is ironed easily. Fresh colors and floral prints work well in both a bedroom and bathroom atmosphere.
Why not co-ordinate the shelf unit with the bathroom shower curtain or window blind? Alternatively, in a bedroom, you could match the fabric to the bed linen.
The blue-and-white shelf unit shown here has three shelves, each measuring 30cm (12in) high, 30cm (12in) deep and 40cm (16in) wide. This makes the perfect dimensions for folded T-shirts, sweaters and other items of clothing, keeping them straight and tidy. However, you can add more shelves if you like, or, with a little imagination, you could design your own hanging unit. A similar shelf unit could house all sorts of accessories, such as shoes, bags, hats and toiletries, with partitions to divide each shelf into separate compartments.
Step-by-Step how to Make a Fabric Hanging Shelf
Materials
Main fabric Firm-weave cotton furnishing fabric 3m (3 3/8yd), 122cm (48in) wide
Matching sewing thread
Hardboard Four sheets, 40 x 30cm (16 x 12in) for the shelf inserts
Sturdy bracket with a top depth of 30cm (12in) and screws
1.Cutting out
Cut out two rectangles measuring 168 x 43cm (66 x 17in) in main fabric for the continuous shelf and back panel. Then cut two rectangles measuring 123 x 33cm (48 x 13in) for the side and top panels. Now, cut six squares 33 x 33cm (13 x 13in) for the side panels, and one rectangle 63 x 33cm (25 x 13in) for the top.
2. Folding the shelf fabric
Taking a 1.5cm (5/8in) seam allowance and with right sides facing, pin and machine stitch panels together across their short ends. Now, measuring down 1.5cm (5/8in) from the top edge, fold the strip into eleven sections, each measuring 30cm (12in) deep. Press firmly.
3. Adding side panels
Taking a 1.5cm (5/8in) seam allowance and with right sides facing, pin and machine stitch a side edge panel to every third section of the shelf and back panel. Repeat to join all six squares to both sides of the panel, leaving 1.5cm (5/8in) un-stitched at the top and bottom of the square. Press all the seams sharply.
4. Forming the shelf base
Taking a 1.5cm (5/8in) seam allowance and with right sides facing, pin and machine stitch the lower edges of the side panels to the sides of the shelf and back panel, situated directly below. Ensure that the right angles are neatly executed, to form neat shelf bases.
5. Forming the shelf top
Repeat Step 4, this time joining the upper edges of shelf pieces to the side edges of the shelf pieces situated directly above, to form the shelf tops. Press the seams sharply.
6. Lining the side panels
Taking a 1.5cm (5/8in) seam allowance and with right sides facing, pin and machine stitch the side panels to the sides of the fabric shelves, along the long front edges. Trim the corners and press to right sides. Now, taking a 1.5cm (5/8in) seam allowance and with right sides facing, pin and stitch the two side panels together, along top edges.
7. Facing the upper section
With right sides facing and raw edges matching, take a 1.5cm (5/8in) seam allowance and machine stitch the inner top section to the top of the side panels, along the front edge. Press to right sides. Now, turn a 1.5cm (5/8in) hem and neatly slipstitch the lower edges to the inside seam, enclosing raw edges.
8. Finishing off
Turn a 1.5cm (5/8in) hem to wrong sides of the remaining raw edges at the back and slip-stitch neatly in place. Insert a hardboard panel into each shelf pocket, screw the bracket in place and hang the shelf from the bracket.
Reference: The Country Look—Decor & Crafts







2 Responses
Janek
Paint the shelves a complimentary color this will blend well.
baldy eire
I am painting the back wall of an entertainment center an feature color. Should I paint the shelves the highlight color or the same as the wall plus surrounding color? Thank for any inspirations.