A Few Common Woodworking Joints
Story & Pictures by Janek Szymanowski ©

There are many different ways to join pieces of wood together. In many instances you can use simple joints, particularly when you combine these with good quality wood glue and/or nails, screws and bolts for extra strength.
The most common types of woodworking joints a DIY enthusiast is likely to use are:
1. butt joints
2. miter joints
3. halving joints
4. bridle joints
5. housing joints
Butt Joints
This is the simplest joint of all woodworking joints to make, but also potentially the weakest.
Butt joints are created by simply attaching two pieces of wood together edge to edge, using wood glue with nails or screws to secure them. In the photograph (left), you can see the white wood glue oozing out of the joint.
To ensure that the two pieces of wood are joined tightly together, the wood should be clamped while the glue dries. This is doubly important if nails and screws are not used. It is also essential to ensure that all edges are straight and square.
Butt joints may be used to build many different types of structures, including carports and pergolas constructed from planed timber. They may also be used to make table tops, shelving, boxes, and even some simple items of furniture.
Miter Joints

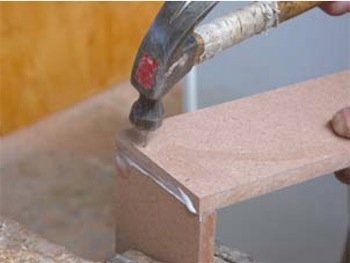
A miter joint is really just a butt joint that has been cut at an angle, usually 45 degrees. This means that they aren’t very strong as far as woodworking joint go, but they are ideal for smaller items like picture frames and small boxes. They are also the obvious choice when joining more elaborate off-the-shelf moldings at an angle. In the picture (left) an off-the-shelf molding is cut at 45 degrees to form this near perfect miter joint for a picture frame.
A miter box will simplify cutting the wood to be joined this way.
If you wish can strengthen some miter joints by reinforcing with small dowels, or by securing a small block of wood to the inside corner of the joint.
Halving Joints
Halving joints are stronger than butt joints, and they may be made in a variety of configurations. However what they all have in common is that these woodworking joints are made by cutting two sections of wood to exactly half their thickness at the point at which they will meet. Then you simply slot them together, using wood glue and fasteners to strengthen the joint
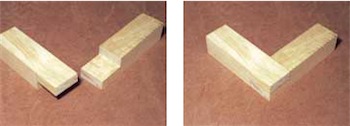
A halving joint cut so that two pieces of timber may be joined at 90 degrees. This creates a simple, reasonably strong corner joint.
>
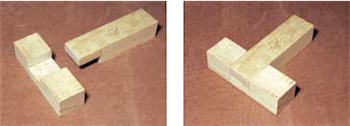
T-halving joint connects the end of one piece of timber to the middle of another, to form a T shape.
Halving joints are often used for decks and railings, to make roof and floor beam joints, and even to construct a simple framework for cabinets and cupboards.
>
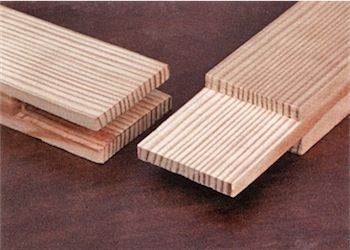
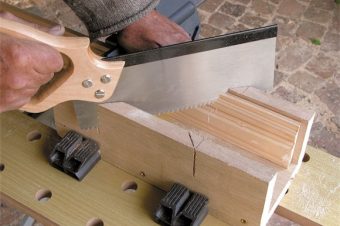
A cross-halving joint is used to connect two pieces of wood so that they literally appear to cross over one another, forming a criss-cross configuration, as shown in the photograph on the left. You can make this joint by sawing to the halfway point with a hand saw (a tenon saw is best), or with a bench or circular power saw. Either way, you then chisel out the wood between the cuts to form two slots, one in each length.
>
>
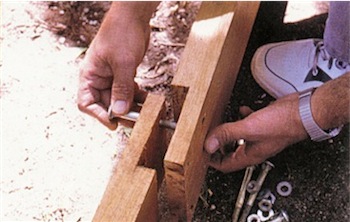
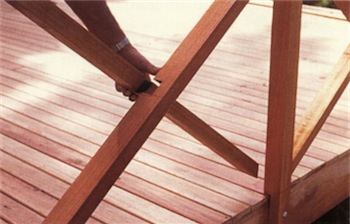
This halving joint (left) has been used to join two beams that form the framework for a timber deck. A cuphead bolt is used to strengthen the joint.
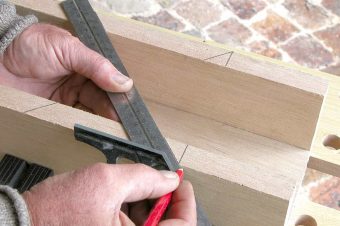
Bridle Joints
A bridle joint is essentially a refined halving joint. It is frequently used for furniture framing and for window and door frames, where the wood either meets at a corner forming an L-shape, or where it meets to form a T.
Bridle joints are considerably stronger and neater than halving joints. They are made so that the two pieces of timber interlock in a similar way to the more complicate mortise and tenon joint, but with a tongue that fits into a centered slot in the other piece of wood.
To make a bridle joint, mark the wood using a gauge (in the same way as you would if it was a mortise and tenon joint). The central core or tongue, as well as the two outer pieces, should each be a third of the total thickness of the wood. Wood that is the same dimensions as the tongue is removed from the other piece of wood, to accommodate the tongue. You can use a bench saw or a hand held electric circular saw to do this. Alternatively use a tenon saw and then chisel the wood out.
Where a bridle joint is at the corner of a frame, the tongue slots through the groove. Where it joins to form a T-shape, in the middle, the piece of wood with the groove slots over the second piece of wood.
Housing Joints
Housing joints (also known as stopped housing joints) are strong load-bearing woodworking joints that are frequently used for steps and for shelving.
They are made by cutting a groove into the side timbers to support the horizontal sections – which may be treads or shelves.
Generally the housing of a housing joint is about half the thickness of the wood it is to support. The depth should be about one-third the thickness.
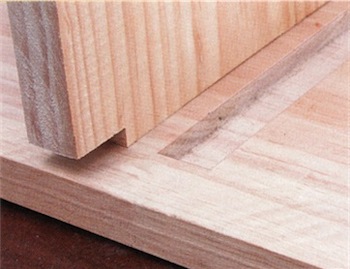
An ordinary housing joint, which is also called a through housing, has a groove that extends across the width of the timber, from one end to the other. A stopped housing (left) stops before the edge so that once the joint has been assembled, it looks remarkably like a butt joint!
These are the 5 most common woodworking joints that you might use in your DIY projects.


2 Responses
An Introduction To Woodwork - Crafting DIY
[…] are many ways to joint wood, depending on what it is you are making. The most common joints are covered in this web site, with detailed photographs that show you exactly how to cut and put […]
How to Make a Mortise and Tenon Joint - Crafting DIY
[…] feature of the common or stopped mortise and tenon joint is that the tenon is exactly a third of the thickness of the piece of wood into which it slots. The […]