All About Batik and How to Make One
This fantastic Batik created by Joanne Gigliotti won First prize in the First American Bank Batik Design competition 2011. It is entitled “Sun Rises from the East and Lights the West: America Completes the Circle”
Waxing, Dyeing, and Ironing Batik
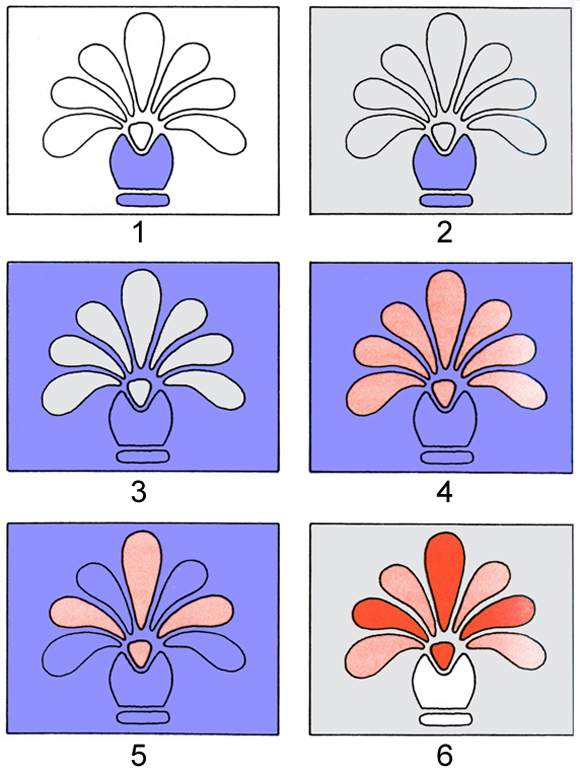
The drawings on this page illustrate the techniques and stages in waxing and overdyeing a typical batik piece. The finished work is shown in the color-keyed design (number 6).
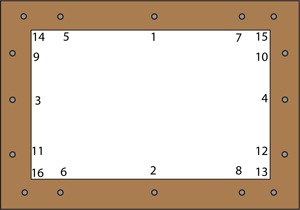
First, the fabric is washed and rinsed to remove the sizing. After the fabric has dried, it is tacked to a frame. Stretch the fabric tautly over a frame (left).
Art supply shops have stretchers of various sizes. You can also use an old picture frame or make a frame of your own. The fabric is attached to the frame with tacks in the order indicated in the diagram.
If more tacks are used then continue placing them in the same alternating pattern as shown in order to maintain an even tension.
The design is drawn on a piece of paper and transferred to the fabric using a charcoal pencil or stick. With heavy fabric you can draw your pattern on cardboard then cut it out and then trace the outline on to the fabric.
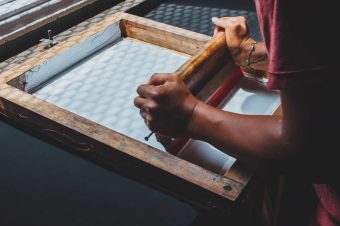
Wax is now applied to your fabric. Wax can be applied with a tjanting, a traditional Javanese tool that consists of a small, hollow metal container with a spout attached to a wooden handle. It is filled by dipping into hot liquid wax. For spreading larger areas with wax then a brush is used.
Dyeing
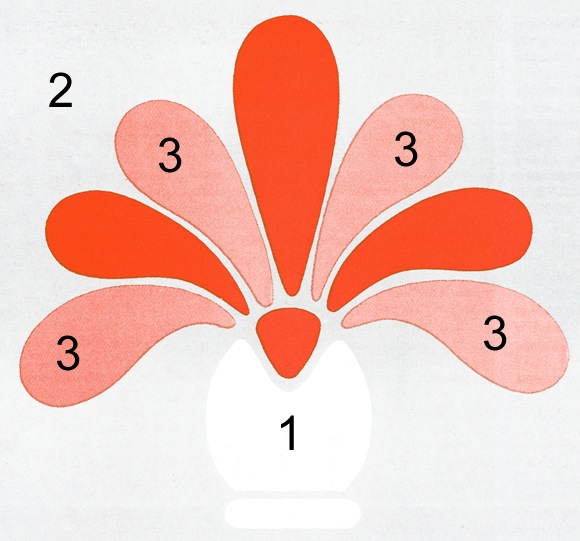
Lighter colors are dyed before darker colors. The flowerpot, which is to remain the color of the undyed fabric, is waxed first. Traditional batik fabrics are unbleached and come in various shades of off-white. This off-white will be the color of the flowerpot in the finished piece. When cotton is used with natural dyes, a special mordanting process must be followed.
1 – Melt & Brush
Melt wax and brush onto flowerpot area (labeled 1 in main drawing).
2 – Grey Dye bath
Remove fabric from frame and immerse in grey dye bath.
3 – Dry & Wax
Dry fabric and put back on frame. Apply wax to background (2).
4 – Pink Dye Bath
Remove fabric from frame and immerse in the pink dyebath.
5 – Dry & Wax Again
Dry fabric and put back on frame. Apply Wax to alternate petals (3).
6 – Dye Red & Dry
Immerse fabric in red dye. Dry. Then iron out all wax.
The last step (not shown) is to iron out the wax.
The fabric is allowed to dry, then it is placed between layers of paper towels or old newspaper sheets for ironing. Colored newspaper, such as comic strips, and recent newspaper are never used, as the ink would be ironed onto the fabric. A dry iron – not a steam iron – is set at the next lower setting to the one normally used for the particular fabric. (For muslin, use a wool setting.)
As the fabric is ironed, the wax melts and is absorbed by the layers of paper. The paper sheets should be changed frequently to keep them absorbent. You will not be able to remove all the wax, but a little residual wax is often desirable, especially for such projects as curtains and wall hangings. Dry cleaning will remove the wax remaining in scarves, blouses, or other garments.
After you finish ironing, there may be some dark rings, or halos, on the fabric. They are caused by the ironed wax spreading into the areas that were left unwaxed. If you do not want the halo effect, you can cover the entire piece with wax before ironing so that the ironing will produce a uniform, if darker, background color. Or you can have the piece dry-cleaned to remove the halo.
Wax Is A Part Of The Tools For Any Batik
A Malaysian Batik
>
Reference: Readers Digest Crafts & Hobbies – A Step-by-Step guide to Creative Skills.
& Wiki Commons.

One Response
How to Tie-Dye 5 Easy Steps - Crafting DIY
[…] Batik – How To Make One In 6 steps […]