How to Make a Nifty Notepad
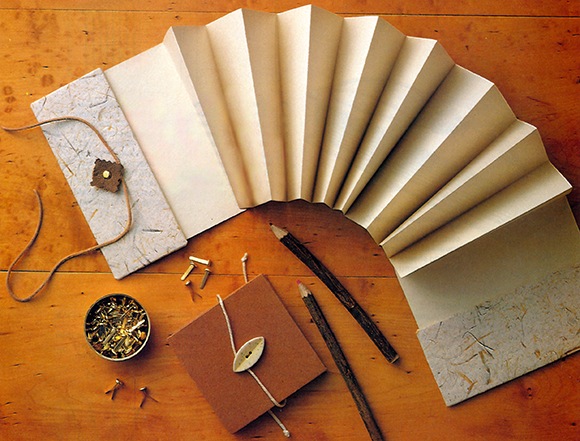
Unfold the pages to note down important messages, then tie round each pad with thonging.
A nifty notepad you say!
Well even in this smart techno rich world today keeping track of appointments and memos with pencil and paper should not be a problem in any busy life. There seem to be so many activities that need to be fitted into each day, and often there are times and points to remember for each activity, so it is useful to have some-where to jot down your own messages as timely reminders like a handy nifty notepad.
Help is at hand in the shape of these smart notebooks or notepads. One can be placed by the telephone, the other is thin enough to slip into your handbag or pocket. These two pads look smart and professional enough to attend any meeting and would make inexpensive, but very stylish gifts for family and friends.
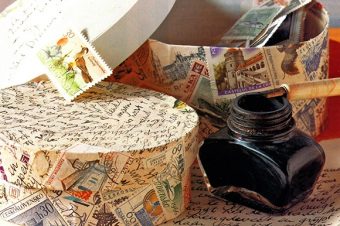
We picked a recycled paper for the cover of the long notepad and a plain brown wrapping paper for the cover of the square pad. For the inside pages use a length of wallpaper lining paper, which gives you the opportunity to add as many leaves inside each pad as you feel is appropriate.
How To Make a Long Notepad

This long notepad is easy to make and would make a wonderful gift.
Materials
Mounting board
Textured or recycled paper
Wallpaper lining paper
Spray adhesive
All-purpose household glue
Brass paper fastener, scrap of leather and card
Pinking shears
Leather thonging 50cm (1/2 yd)
Craft knife
Pencil and ruler
Chenille needle & Hammer Scissors
1. Cutting out the covers
For the outside covers of the notepad, cut out two pieces of mounting board so that each one measures 17 x 7cm (6 ¾ in x2 ¾ in). Also cut out two pieces of textured paper so that each one measures 20 x 10cm (8 x 4in). This is for covering the card pieces.
2. Covering the covers
Spray adhesive over wrong side of one piece of paper. Place one piece of mounting board centrally on paper. Press in each corner over mounting board, then turn and press over the edges, sticking firmly. Repeat, to make up a second end.
3. Folding pages
Cut a strip of lining paper 132 x 16cm (52 ¼ x 6 ¼ in). Mark long edges into 6cm(2 3/8 in) sections. Fold the paper along first two marks; crease firmly. Then fold in the opposite direction and crease. Concertina the remainder of the strip in this way.
4. Making a fastener
Cut a 2cm (3/4 in) square of card. Cut a 2.5cm (1in) square of leather with pinking shears. Stick card to leather centre.
5. Piercing holes
Use a sharp needle and hammer to pierce hole in center of one card end. Pierce a similar hole in centre of leather square.
6. Fixing the fastener
With right side uppermost, insert a paper fastener through leather square then through the card cover. Spread prongs on wrong side and glue.
7. Sticking in the pages
Stick the first page of the concertina paper centrally over the wrong side of pad front. Then glue the last page centrally over the wrong side of the back cover. Cut two pieces of textured paper 16.5 x 6.5cm (6 ½ x2 ½ in). Stick over the concertina sheet to neaten.
8. Binding up the notepad
Bind the leather thongs round the notepad and knot round the central leather square to hold in place.
How to make a Concertina Notepad
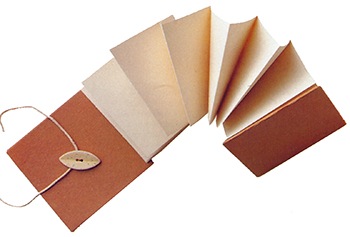
1 – Cut Mounting Board
Cut two 10cm (4in) squares of mounting board and cover with two 13cm (5 ¼ in) squares of textured brown paper.
2 – Cut Lining Paper
Cut a strip of lining paper 198 x 9cm (77 x 3 ½ in) and carefully fold up concertina style into 9cm (3 ½ in) square pages.
3 – Fasten With Button
Fasten the notepad with a button. Place the button centrally on cover front and mark through the holes with a sharp chenille needle.
4 – Sew On Button
Sew on the button with a double thread; knot the thread ends together at the back and seal with adhesive against the back of the cover.
5 – Bind With String
Complete the notepad in the same way as before, binding it with a length of string.
Reference: The Country Look—Decor & Crafts


One Response
The Art Of Origami - How To - Crafting DIY
[…] you have mastered the models here, you can find other models online and in books. But better still, you can add a little imagination to your scant store of tools and […]