String Art is Symmetrical Art
String art makes circles out of straight lines-and this is probably as close as we will ever get to squaring the circle. The art form originated early in the 20th century, when drawings were used in mathematics books to show how to draw curves from straight lines. Later these pictures were re-created with string stretched across nails, and artists soon adapted the technique, adding color and combining textures, to create string pictures and sculptures that transcended their instructional value.
True to its origins, string art is highly dependent on geometric forms. It’s great order and symmetry are the basis of its appeal.
Tools and materials
To make a string picture, only a few common tools and materials are required. For designing the picture you need a pencil (or several colored pencils), paper, and a compass and a protractor to draw and measure circles.
Then form the background surface, choose a board into which you can drive nails easily. A piece of l/2-inch plywood is ideal, but any kind of wood can be used. The length and width of the board are determined by the size of the picture. The board may be painted, shellacked, varnished, or covered with fabric (which is attached to the board with a good stapler or staple gun). You will also need a supply of masking tape with which to temporarily attach the pattern to the board.
The most important tool used for string art is a hammer. Get one that is comfortable for you to work with, as you will be driving a lot of nails. You may also want to keep a pair of pliers handy for straightening nails that get driven in at an angle by mistake.

The key materials are nails and string. Any type of nail can be used, but 16-gauge brads are ideal. Gilt- or nickle-plated nails look better. If your picture will be fairly flat, use l/2-inch brads. If you want to create depth, or if certain nails will have to support many windings of string, use 1-inch or even 1 1/2-inch brads. If you design a picture with layers of different designs, use nails of different heights.
Any type of string, thread, yarn, or fine wire can be used to form the design. Your only considerations are how it will suit your pattern and how it will look against the background. If you prefer to use wire, get fine (28- or 32-gauge) copper, brass, or galvanized wire at a hardware store. Use a variety of different colors, types, and thicknesses of string in a picture to create an interplay of colors and textures. It is a good idea to create the design for your picture first, and let the design rule the materials you will use.
Designing a String Picture
You can make a string Picture of almost anything under the sun (and of the sun itself, if you wish). Generally, abstract forms work best in string art, but representational pictures can also be effective and beautiful. Among the most popular subjects are sunbursts, owls, butterflies, and bridges.
String art relies greatly on geometric shapes. Designs made up of straight lines are easy to deal with. You simply stretch string across the board to form the shape as your eye sees it. But circles and other curves are different.
Illusion of a curve.
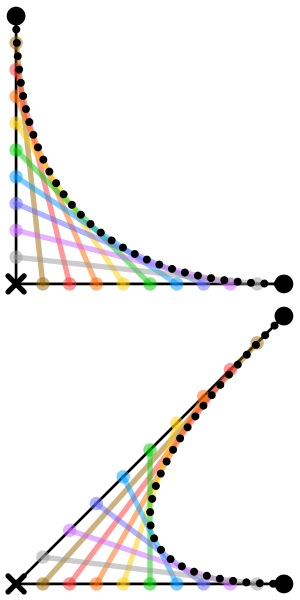
There is no way to make a string stay curved in mid-air. You must create what looks like a curve by using straight lines.
Circles are formed by arranging points in a circle and by connecting these points with straight lines in such away as to fill in the area enclosed by the points. The area may be filled completely, or it may be filled partially, with a circular opening suspended in midair at the center. Any number of points can be used. The more points you use, the more closely knit the circle will be. Instructions for drawing an18-point circle are given below.
Other curved figures are simpler than the circle. Any two lines can be connected with crisscrossing lines to produce a curved, web-like figure.
Learn to draw the figures shown below, and experiment with shapes of your own devising. Then design a string picture with pencil and paper, combining and altering these basic figures.
Rules of designing.
When designing for string, keep in mind two important rules: (1) the distance between adjacent points on the line the nails will follow must be exactly the same; (2) when two lines are connected, the number of points on each line must be the same. These will assure the symmetry that is so important to string art.
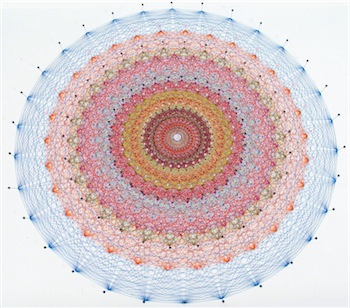
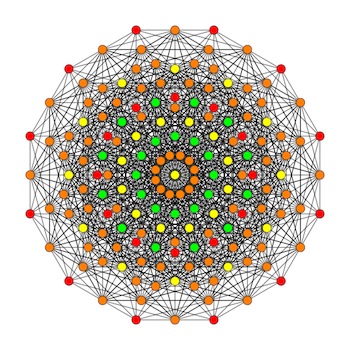
What is a 4 21 polytope?
The top two illustrations on this page are polytopes and most string art is based on this geometry, you can read more here: 4_21_Polytope
Drawing open and closed circles
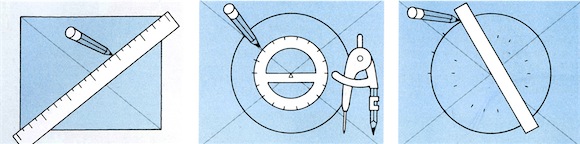
Step 1 – Find The Center
To find the center for the circle, draw diagonal lines against a straightedge from the upper left corner of the paper to the lower right corner and from the upper right corner to the lower left.
Step 2 – Place A Pair Of Compasses
Place the point of a pair of compasses where lines intersect and draw a circle. Place the protractor on the drawing, with it’s center on the center of the drawn circle, hold steady and draw dots every 20 degrees around the circumference of the protractor.
Step 3 – Straightedge or ruler
If the circle is to be larger than the protractor, run the straightedge (ruler) through the center of the circle and two of the opposite dots drawn in Step 2. Mark dots on the outside circle drawn in Step 1.
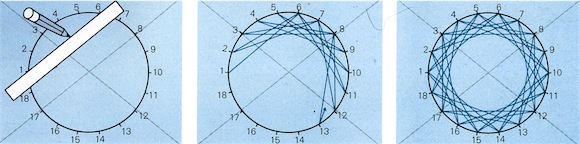
Step 4 – Open circle
Continue marking off dots all around the circle, then number the dots. Using a straightedge as guide, draw a line from point 1 to point 6, and another from point 6 to point 2.
Step 5 – Draw Lines
Continue drawing lines against straightedge, moving in a clockwise direction. Draw a line from point 2 to point 7, then from 7 to 3, 3 to 8, 8 to 4, 4 to 9, 9 to 5, 5 to 10, and so on.
Step 6 – Continue Lines
Carry on drawing lines, progressing in the same clockwise manner, until you have come full circle. A line stretching from point 5 to point 1 should be the last.
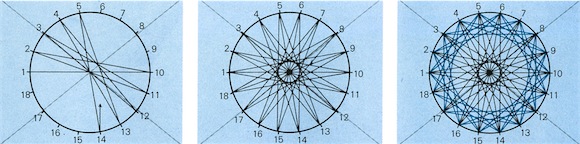
Step 7 – Closed circle
Begin by drawing the line between points 1 and 10 (directly opposite). Progress clockwise, as with the open circle: 10 to 2, 2 to 11, 11 to 3, 3 to 12, 12 to 4, and so on.
Step 8 – Complete Circle
Line from point 9 to point 1 completes circle. If you prefer a slightly open circle, begin lines between 1 and 9 or 1 and 8. The fewer points you skip, the wider the inner opening will be.
Step 9 – More Circles
To superimpose one circle on another, draw the points and fill in the lines across the circle with the smaller inside opening first. Then, using the same points, fill in the other circle.
Reference: Readers Digest Crafts & Hobbies – A Step-by-Step guide to Creative Skills.
& Wiki Commons.


2 Responses
Spinning From Fiber To Yarn - Crafting DIY
[…] yarn can be used in many CraftingDIY ways, one of them is String Art with your own spun […]
DIY Macrame
[…] to mend fishing nets. Having learned the art of knotting, sailors used their time at sea to make more decorative items using the craft. Back on shore, they would sell or barter the items they had made while they were […]